Thursday, March 27, 2014

Lacquer Legion: Lucky

As a nail blogger there are a lot of things I feel fortunate about. I have an excuse to justify my excessive purchases and I get to play with pretty polishes on a regular basis. The thing that makes me feel the most lucky, though, is getting to form friendships with other ladies who love polish as much as I do. These are some of the nicest, most genuine and truly awesome people I've ever met- just not in real life.

When I saw that the Lacquer Legion theme for March was Lucky I wanted to show off a polish that I was lucky enough to win in a giveaway from one of my favorite bloggers, Becca of Franken Femme. I also feel incredibly lucky that she's become one of my best blogger friends. Her polishes are amazing and her posts always make me laugh. If you've never seen her blog or are curious about learning how to make your own custom polishes I definitely recommend taking a look. 


Lacquer Legion March Challenge Lucky Franken Femme Polish

Becca created this custom color for me as a prize in her giveaway and I can't believe I waited this long to try it. Every time I look at my nails I find something new and awesome that I didn't see before. The polish is a little sheer so I've used three coats here to get full coverage. It built up very easily and evened out to a nice smooth finish. The purple jelly base is full of gold flakies and tons of holographic and dark purple shimmer that give it a lot of depth and sparkle. I love that the base is just a bit dusty which makes it stand out from the other purples I have in my collection. I wish Becca sold her polishes because I'd be totally hooked (and very poor). For now I have to content myself with mixing up my own frankens on a fairly regular basis.

Lacquer Legion March Challenge Lucky Franken Femme Polish

Lacquer Legion March Challenge Lucky Franken Femme Polish

Lacquer Legion March Challenge Lucky Franken Femme Polish

Head over to the Lacquer Legion on Facebook or search for #LLlucky to see what has everyone else feeling lucky this month.

Tuesday, March 25, 2014

He Picks My Polish: March Edition

It's been a really long time since I've done a He Picks challenge. The last one was in November and my husband took it really easy on me choosing black, white and pink. I told him this time not to hold back- pick anything he wanted. I'm not surprised that two out of the three colors are ones he's picked out and given to me as gifts. Does he remember or is it just a coincidence?? Maybe he's noticed that I don't wear these much and he's trying to help me use my forgotten polishes. Of course the first thing I though of (and blurted out) was "Barney colors?" His inspiration was so much better than mine. He was looking at the plants in the window- spider plants with long green leaves and white edges and African violets. Since that was ten times better than anything I would have thought of, I decided to go with it.

He Picks My Polish March 2014 Violets

He Picks My Polish March 2014 Violets

The polishes he picked:
LA Colors- Energy Source (white)
LA Colors- Current (green)
Pure Ice- Purple Rain

I started with two coats of white. I used a sponge to create a vertical gradient blending the green out from the center. I painted on the violets with a small nail art brush and dotted Sally Hansen's Expres-so Yellow in the middle of the flowers using the same tiny brush. 

As far as these nails go... not my favorite. I don't think I realized how much I paint my nails for me- the colors and designs I want- even though I'm writing my blog for others.
It came out totally cute, but this is definitely not something I would choose for myself.

He Picks My Polish March 2014 Violets

He Picks My Polish March 2014 Violets

If you're curious to see what crazy color combinations the other "hes" picked out check out the links below.


Friday, March 21, 2014

Franken Polish: Sarah-Rose

I've been at it again creating some frankens. I was talking to a friend at work who said she got a bunch of polishes for Christmas and hated them so much she was going to throw them away. What even is this?? I don't understand! I tend to love all my babies no matter how temperamental or strangely colored they are. I told her I'd be happy to give them a good home and in return I'd mix her some custom colors that she could enjoy wearing. It's easy to mix things up for myself when inspiration strikes, but I really had a hard time coming up with ideas for unique polishes that didn't lean too far into my personality. I would never have thought of making this for myself, but I ended up liking it so much I mixed up an extra bottle to keep. It's appropriately named after my inspiration- Sarah.

Franken Nail Polish Sarah Pink Foil

Franken Nail Polish Sarah Pink Foil

Behold the delicious gold flakies.

Franken Nail Polish Sarah Pink Foil

Franken Nail Polish Sarah Pink Foil

Above are the polishes I mixed together. I started by filling my small bottle about 1/3 full of Wet n Wild, The Gold & the Beautiful. The next third is LA Colors, Dazzle. My last third is a mixture of E.L.F (sadly unnamed polish) and Wet n Wild, Gray's Anatomy. The gold flakies really give it a lot of shine and the E.L.F polish gives it some nice depth and sparkle. The formula was just a bit thick- it could probably do with a drop or two of thinner which I was too lazy to add. 

The franken polish ended up with a very foil-like finish and overall I'm pretty happy with the results. It's not a color I would normally choose because of how girly and delicate it is. I typically go for something dark or bright, but it's nice to change it up every once in a while.

Franken Nail Polish Sarah Pink Foil

Franken Nail Polish Sarah Pink Foil

Sunday, March 16, 2014

Get Lucky Nail Art Challenge: Shamrocks and Rainbows

 I don't think it's a secret how much I love rainbows. Something about the completeness and the chromatic perfection is really pleasing to me. Sadly my gradient skills are not helping me out with this today. My yellow and purple got a little bit lost so I only have most of a rainbow to show you today. I also had a bit of a water marble fail on my index finger. The solution was obvious: cover it with shamrocks! I'll give my self credit for the intention, but low points for execution. I definitely want to try the six color gradient again in the future. Maybe I'll get luckier next time. ;)


The theory behind the full rainbow gradient is to start out with a white base then trim a makeup sponge to roughly the size of your nails. I painted the stripes of color directly onto the sponge and then rolled it side to side over the nails to blend the colors. I think my two biggest problems here was that my sponge was slightly too long so I kept missing the purple on the tips. My blue was also too opaque for the color palette so when I moved the sponge up higher to get some purple in there the blue just ended up dominating half the nail. 
Here's what I used for the rainbow- 
Wet n Wild Wild Shine- Red Red
Wet n Wild Wild Shine- Sunny Side Up
Sally Hansen Insta-Dri- Expres-so Yellow
Wet n Wild Wild Shine- Stand the Test of Lime
Sinful Colors- Endless Blue
Nuance- Lilac


I did a water marble on the other three nails using Spoiled- Permission to Proceed, LA Colors- Deluxe, and LA Colors- a shimmery apple green color with no name (you can barely see it on the tip of the pinkie anyway). I hand painted the shamrocks using China Glaze- Holly-Day.


Lets see what the rest of our lucky nail artists came up with today.


Saturday, March 15, 2014

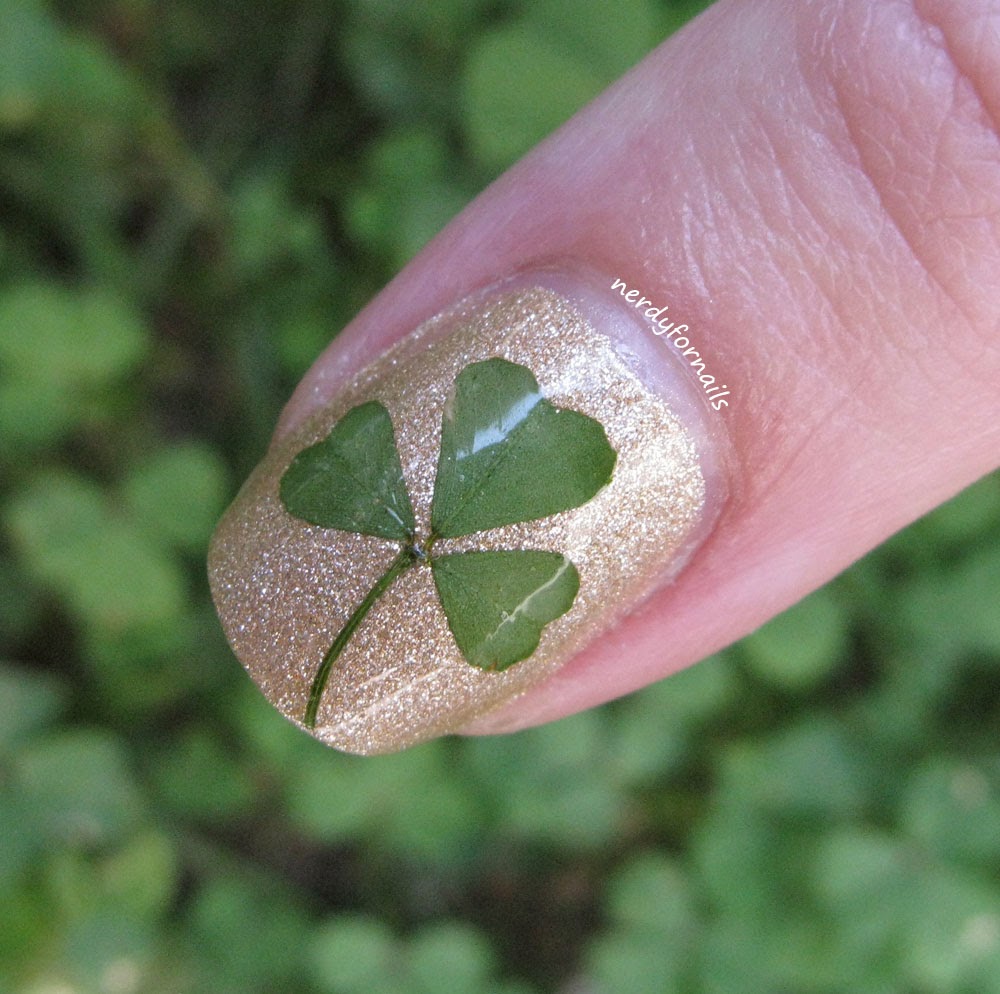
Get Lucky Nail Art Challenge: Ireland Inspired- Real Clover Nails

I'll admit, I had a bit of trouble coming up with something for today's challenge. I don't feel like my landscape painting skills are good enough do Ireland justice and apparently I'm just not feeling that creative today. Luckily I saw this super cute clover manicure by Concrete and Nail Polish and then I found this absolutely stunning version by Gnarly Gnails. I had to try it myself and it's perfect for today's theme because to me Ireland seems very green and alive so putting real clovers on my nails is a great way to represent that.

Ireland Inspired Real Clover Nails

Ireland Inspired Real Clover Nails

I started with two coats of both polishes- Orly Jealous, Much? and OPI Love.Angel.Music.Baby from the Gwen Stefani collection. I know it's supposed to be satin, but I had to top coat it to stick on the clover. Luckily (pun intended) it's still really gorgeous shiny. I pressed the clovers overnight in the pages of a magazine to flatten them. I think this is the key to getting them to stay down properly. I added a layer of top coat on my already painted nails, then immediately stuck on the clover. Because the ones I chose were so thin and small I had no trouble getting them to lay down flat in the wet polish. I added two more coats of top coat to make sure they're really stuck in there and to smooth everything out. This was really fun and easy and I love that I got to use something from around the house (or back yard in this case) to create a slightly unusual manicure. What's the craziest thing you've ever stuck to your nails?

Ireland Inspired Real Clover Nails

Ireland Inspired Real Clover Nails

 Check out the links to see what inspires everyone else:


Friday, March 14, 2014

Get Lucky Nail Art Challenge: Shades of Green

It's challenge time again! With St Patrick's Day right around the corner a few lovely ladies have put together this festive challenge. I can't wait to see what everyone comes up with.


First up is Shades of Green. I've been dying to try a pond manicure (you can see the first one ever at Olive View Fashion) and this seemed like a great opportunity to do it. The different shades are created by layering white and green polish together.

Get Lucky Nail Art Challenge Clover Pond Manicure


Get Lucky Nail Art Challenge Clover Pond Manicure

I started out with one coat of Spoiled, Permission to Proceed. It's important to use a sheer jelly polish so you can see through the multiple layers. Using a dotting tool I connected three dots to form a clover shape using white polish, then added the stem to each with a small nail art brush. I started out with two clovers on each finger, covered that with another coat of green polish then did two or three more clovers in alternating places on the nail followed by another coat of green. I did 3-4 layers like this until most of the nail was covered ending with a final coat of green. I love the depth you get with this technique and it was really easy even on my first try. The main thing is to allow the shapes to dry completely before painting over or you'll get streaks. For more info and detailed instructions check out this great tutorial by Adventures in Acetone.

Get Lucky Nail Art Challenge Clover Pond Manicure

Get Lucky Nail Art Challenge Clover Pond Manicure

Hope you're not tired of green yet because here's a whole lot more of it:


Monday, March 10, 2014

Sparkle in the Sky

Today I've got my second ever textured polish to show you. I was less than impressed by my first texture experience so I was a little surprised by how much I liked this one. I bought it completely by accident too. Sparkle In The Sky is from the Finger Paints 2013 Enchanted Winter Collection. Every polish from that collection was textured which I didn't realize until later. I grabbed this one thinking it was just a pretty sparkly polish, but I was pleasantly surprised to find that there was more to it.

Finger Paints Sparkle In The Sky Texture Polish

Finger Paints Sparkle In The Sky Texture Polish

The application was so smooth especially when you see how bumpy it dries. It was a bit sheer with the first coat, but evened out nicely on the second. The wear time was amazing too. I had it on for 6 days with only minimal tip wear. The nice thing about this polish is that it was textured enough to make a visual impact, but not so much that it was irritating to touch which has always been my fear with textured polishes. Plus I love how you can really see the sparkle on the nails that are out of focus. This dusty blue shade with purple and green micro glitter reminds me of bad 90's jeans with the Lycra and shimmer sewn in. I think it's a much better look for nails than it is for legs. :)

Finger Paints Sparkle In The Sky Texture Polish

Of course I had to find out what it looks like with top coat. This is with two coats of Sally Hansen's Dries Instantly. It probably could have used one more coat to be completely smooth, but you get the general idea. Next time I'll definitely be embracing the texture and wearing it without top coat.

Finger Paints Sparkle In The Sky Texture Polish

Finger Paints Sparkle In The Sky Texture Polish

This polish has officially changed my mind about textures. And maybe the swatches of the new Zoya Magical Pixie Dust polishes helped a little too. I'm dying to try them. What do you think about textured polishes? Have you jumped on the band wagon or will you let this trend pass you by? Although it doesn't look like it's going away anytime soon.

Friday, March 7, 2014

Flakies! Or My New Obsession

 Do you ever love something, but not realize it until it's too late? That's what happened to me with the 2012 Finger Paints flakies collection (officially called Special Effects Collection). I bought one color on a whim because it looked cool on the shelf, but by the time I realized what a gorgeous miracle flakies are my Sally's was all sold out. If you've never seen the whole collection do yourself a favor and check out these swatches from The PolishAholic. Great! Now that you've done that you can live a life filled with flakie-regret like me. 

When I saw Finger Paints was putting out a new collection this year, the Kaleidoscope Collection, I was determined not to make the same mistake twice. I eagerly Googled swatches, and was sad to see the new flakies just don't measure up to the old ones in brightness. Still, I couldn't pass up this opportunity a second time so I narrowed it down to my two favorites and bought them before they had a chance to go extinct (or sell for quadruple the original price on ebay). The first one I have to show you is Abstract Attraction which is a purple/blue flakie in a clear base. It's not particularly bright, but it's nice in its own subtle way. Despite my complaints I'm still totally in love with it. Purple and flakies- two of my favorite things.

Finger Paints Flakie Polish Abstract Attraction Kaleidoscope Collection

Finger Paints Flakie Polish Abstract Attraction Kaleidoscope Collection

This is two coats of flakies over black. It's still a little on the sparse side now that I'm looking at the pictures. I'm thinking three coats may be the way to go if you want your flakies to pop more.

Finger Paints Flakie Polish Abstract Attraction Kaleidoscope Collection

Finger Paints Flakie Polish Abstract Attraction Kaleidoscope Collection

Finger Paints Flakie Polish Abstract Attraction Kaleidoscope Collection

Now that I'm on the hunt for more flakies which ones are your favorite? 

Monday, March 3, 2014

Zoya Petra

Today I've got one last Zoya to show you out of the three I bought during their January promotion. I reviewed Aurora and Storm earlier if you wanted to take a peek back at those. Petra is definitely the most plain of the three and also the hardest to photograph. It appears much lighter in the bottle than it does on the nail and it turned out to be really tricky to get the camera to pick up the dusty tones of this purple.


Overall I've been really impressed by Zoya. I love the colors I picked from the sale this time and the formulas on the two holos were outstanding. I did have a bit of trouble with Petra. This polish was really thin which made it hard for me to keep it from pooling and get even coats. It may thicken up with time, but either way it wasn't enough of a hassle to prevent me from wearing this one again. I'm a sucker for anything purple and I really love the way Petra looks in real life even though it was hard to capture on film.


Because I don't have many pictures today here's a bonus shot of my cat. He really seems to be enjoying the cloudy weather lately.