Thursday, December 31, 2015

New Years Nails: 2016

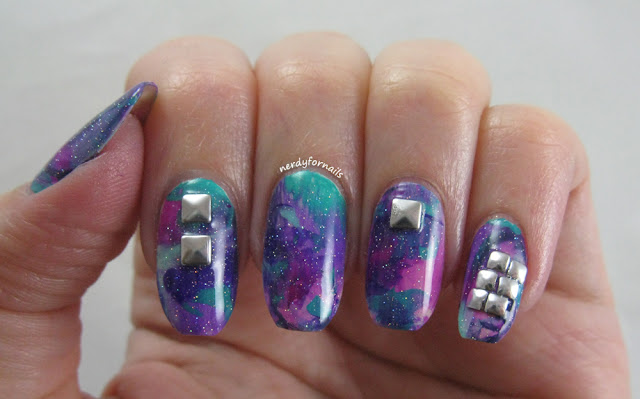
Smoosh Art New Years Nails 2016

Happy New Years! I'm so excited about the three day weekend. 2015 was a great year for me, and I'm looking forward to things getting even better in 2016. I'm starting things off right in the new year with some of the easiest nail art and Fairy Dust! I finally bought it on sale at Sally's and I'm so glad. It's just the right amount of sparkle without overwhelming the art underneath. I'm also back to coffin shaped nails which I loved when I tried them at Halloween. I think I might keep this shape for a while this time.

Smoosh Art New Years Nails 2016

Do you see what I did here? Count the number of studs on each finger and you'll see why these are my New Year's nails.

To create this look I dotted blobs of nail polish onto a plastic sheet and smooshed them with my stamper, then pressed onto my nails. I did a couple layers on some nails to get full coverage and give more depth. It's really easy to get an interesting an fun look with this technique. I'm sure it already has a name, but I'm calling it smoosh art.

Smoosh Art New Years Nails 2016

I also picked up My Vampire is Buff by OPI on clearance at Sally's which I used as my base for this manicure. From the way everyone talks about how amazing this polish is, I expected the formula to be better. My first coat was really streaky and the brush dragged at the color. The second coat fixed the streaks, but I was a little disappointed to see them in the first place. For my color blobs I used shades of purple and teal. 
Sinful Colors- Dream On
China Glaze- Plur-ple, Violet Vibes, Queen B and Too Yacht to Handle
Island Girl- Aloha Paradise
Orly- Saturated
The two different sizes of studs are from Born Pretty. I topped it all off with Fairy Dust from China glaze and my favorite top coat.

Smoosh Art New Years Nails 2016

 Are there any nail shapes or trends you're looking forward to trying in the new year? I think I'd have to answer "all of them." I love the challenge of trying new things.

Friday, December 25, 2015

Merry Sparkle-mas

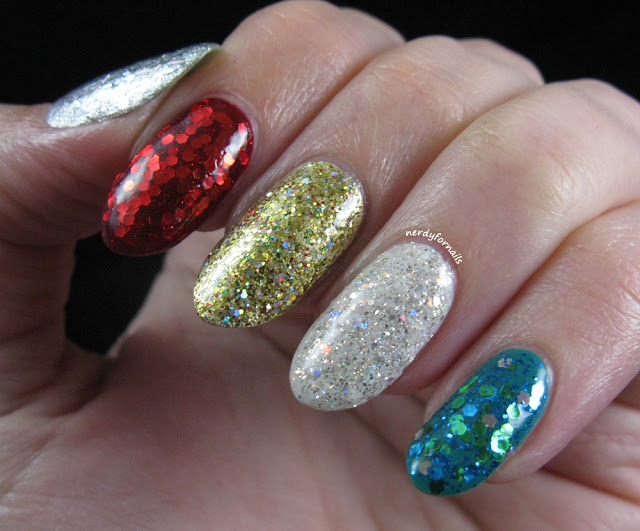
Glitter Sparkle Christmas Nails

It's still Christmas, this post still totally counts. I've been really busy today... killing dragons. Skyrim has been resurrected from the pile-o-games that I never quite finished the first time around. It's still just as addictive. I'm missing my family a ton, but being so far away means playing Skyrim all day in my pajamas guilt free. I'm taking a small break from dragons to post these sparkle overload nails.

Skyrim screenshot. Dragons!

Glitter Sparkle Christmas Nails

I used a ton of polishes for these nails.
Thumb: Spoiled, Daddy's Credit Card; LA Colors, Sparkling Diamonds and Tinsel
Index: China Glaze, Seeing Red; Milani, Red (large hex glitter); 
Sally Girl, Red Glitter (snowman bottle)
Middle: Orly Color Amp'd, Hollywood Royalty (Christmas present from mom. Thanks!)
Ring: China Glaze, There's Snow One Like You; Zoya, Cosmo
Pinkie: Spoiled, Distant Memory; Milani, Teal (large hex glitters)

Most of these took three coats for complete glitter awesomeness, but were chosen because I know they have great coverage in about 2 coats. The Milanis are great for being packed with dense glitter. I feel like my nails are covered in metallic wrapping paper.

Glitter Sparkle Christmas Nails

If not for the 75% off clearance sale at Sally's tomorrow, I wouldn't be leaving the house at all this weekend. Aside from that one short excursion I'm looking forward to two more solid days of dragon killing, looting and general mayhem. What are you up to this weekend?

Sunday, December 20, 2015

Snowflake Gradient Nails

Snowflake Gradient in Grey-scale with Stamping

I love winter! It's even better here in Oregon where actual weather happens. Last weekend we got our very first snowflakes of the year, but they all melted as soon as they hit the ground. I got to spend the whole weekend inside all cozy making these snowflake cookies. I gave away a lot at work, but it didn't prevent me from eating way too many this past week. At least my nails won't make me fat.

Snowflake cookies with royal icing

Snowflake Gradient in Grey-scale with Stamping

For these nails I started with a base of Sally Hansen Complete Manicure in Ion. Over that I layered Lost Soul from LA Colors. This one is a really pretty shimmery grey, but it's very sheer so the creme base was needed for opacity.

For the snowflake stamp I used Bundle Monster plate BM-323 and grey and white stamping polish from Mundo de Unas. I swirled the grey and white together in the middle with a toothpick on the plate before scraping to blend the colors together and create the gradient effect with the stamping.

Snowflake Gradient in Grey-scale with Stamping

I can't believe Christmas is next week! Are you ready yet?

Saturday, December 5, 2015

Keep Calm Lip Balm- Review and Giveaway

Rimmel Keep Calm Lip Balm Review and Nails

I don't know about you guys, but I always have a hard time keeping calm around the holidays. Every year I get the idea that frosting sugar cookies with royal icing is a good idea and that this time I won't get tired and bored after the third cookie even though I know I will and the recipe makes about four dozen million. I've gotten the itch again and just ordered 7 new cookie cutters from Amazon so I'm pretty much committed now. Between that and trying to shop while absolutely everyone else in the city is also out shopping it can be tough to have a relaxing holiday. Luckily this year I've already finished all my shopping so I'll just hermit up inside and bake for the rest of the month. Here's a present idea that might help keep your shopping list a little calmer this season.

Rimmel has come out with these adorable Keep Calm lip balms just in time for Christmas which I think would make really cute stocking stuffers for people who are addicted to lip balm. I already have about 20 different kinds hiding out around the house, but I'm always more than happy to get a few more. If I have to move more than 3 feet to get to my closest balm I become the opposite of calm so I make sure I'm stocked up. I received a couple of these balms to review so read on to see what I thought (these are a press sample, but opinions are my own/honest). I also got an extra set and wanted to do a holiday giveaway for all my favorite readers. Enter at the bottom of this post.

Rimmel Keep Calm Lip Balm Review

The colors I got to try are Keep Calm and Rock (berry blush) and Keep Calm and Party (violet blush). There are five varieties total including Keep Calm and Shop (clear), Kiss (pink blush), and Play (rose blush). They aren't scented to match the colors, but all seem to smell the same. To me it's a mix of rose water and baby powder which I actually rather dislike. I'm not a big fan of most scents in general and especially not so close to my nose. I could only manage to wear these for a few minutes before I had to wash it off due to the perfumey smell. If scented products don't bother you then I'd say go for it, but if they do you might want to skip this one.

Rimmel Keep Calm Lip Balm Review

The Keep Calm Lip Balms claim to increase lip moisture by 22% vs bare lips. The texture was nice and felt pretty moisturizing, so I could agree with this claim. The tints are nice as well. This is something I'd probably throw in my purse for when I'm too lazy for lipstick (which is about 98% of the time). The packaging is probably my favorite part though. I love the bright colors and Keep Calm theme. These are sold at most major drugstore chains for $2.50.

Rimmel Keep Calm Lip Balm Review

Rimmel Keep Calm Lip Balm Review

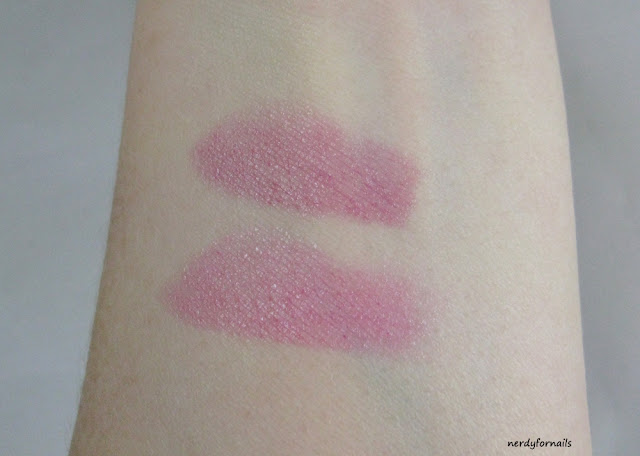
I've swatched these on my arm to show the colors. The top is Keep Calm and Party (violet blush) and the bottom is Keep Calm and Rock (berry blush). I think the tint is just enough to give lips some color and still look pretty natural.

And here are the obligatory nails.

Rimmel Keep Calm Lip Balm Review and Nails

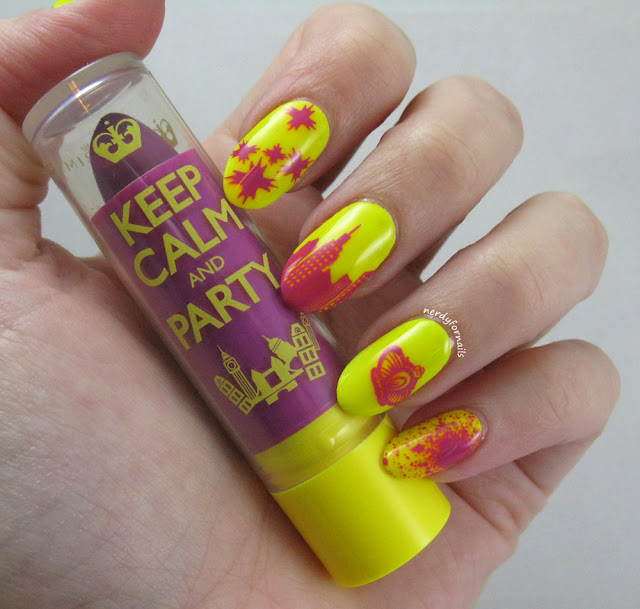
I'm glad I finally had a valid excuse to use my Keep Calm and Polish On stamp (Bundle Monster plate BM-619). I painted each hand with colors to match the balms so you get to see the mythical right hand this post. For the Rock nails I used LA Colors, Static Electricity for the base and stamped with Mundo de Unas #15 with Bundle Monster plates BM-610*, BM-320*, BM-411 and BM-423 (*also used on the other hand). For Party my base is LA Colors, Hysteria (a white base is highly recommended to make this yellow pop) and MdU #21 with plates BM-414 and BM-202. When I took these of my cotton balls looked like neon cotton candy.

Rimmel Keep Calm Lip Balm Review and Nails

Rimmel Keep Calm Lip Balm Review and Nails

Giveaway Time!
The prize is one Keep Calm and Rock and one Keep Calm and Party as pictured above.

a Rafflecopter giveaway

Rules:

1. Must be 18 or older.
2. Must be a resident of the US.
(Sorry, still too poor to afford international shipping.. someday though)
3. No giveaway accounts- these will be disqualified.
4. Giveaway ends 12/12/15, 12:00 am PST
5. The winner will be notified by email and will have 48 hours to claim their prize. If the prize isn't claimed within 48 hours a new winner will be chosen.
6. Other legal stuff I forgot/don't know about? So official, these rules.


Thursday, November 26, 2015

Pumpkin Pie Nails


Happy Thanksgiving! I'm about to rush off to family dinner where we're having pizza instead of turkey, and no pumpkin pie, but that's really fine with me since I don't actually like pumpkin pie. I do like turkey, but what a lot of work. Maybe next year. I think it looks much tastier on my nails than my plate. My favorite is chocolate silk and homemade whipped cream. Do you have a favorite/least favorite pie?


I found this perfect pumpkin pie shade- Spat! from LA Colors recently at Dollar Tree. I'm usually really impressed with these polishes for the price, but this one had a terrible formula. It was really streaky and took 3 coats to cover completely. It dried with a slightly matte finish like a neon, but did dry reasonably fast. My pie crust is Finger Paints, Don't Make A Scene with shading in Spoiled, Pumping Gas. The whipped cream is Sinful Colors, Snow Me White with Spoiled, Pearly White Teeth accents.


Sunday, November 15, 2015

Harry Potter Inspired Nails

Harry Potter Inspired Nails with hallows, snitches, glasses and lightning bolts

This weekend Eugene hosted its first Comic Con in 10 years. What a lucky coincidence that we just moved here right? I actually hadn't ever been to a Con before, but very jealously look at pictures from San Diego every year wishing it wasn't so far/expensive/tickets sold out within 30 seconds of going on sale. I think this smaller Con was a great first experience. I got to meet Vegas PG (she was awesome) and check out a lot of cool vendors. 

I didn't dress up this time, but you know at least my nails had to be in costume. I've been listening to the Harry Potter series on audio book the last couple months and right now I'm on the last one. I read all the books when they came out years ago, but it's been really fun going through them again. This cute little drawing of Harry Potter symbols was the perfect inspiration for the nails I painted for Eucon. It's got little hallows, lightning bolts, Harry's glasses, golden snitches and flying keys.

Harry Potter background drawing

I started with two coats of 4 In the Morning from OPI which is a dark grey/black matte polish. I used Sally Hansen Color Foil in Liquid Gold to hand paint the symbols, then finished it off with Wet n Wild Matte Top Coat for good measure.

Harry Potter Inspired Nails with hallows, snitches, glasses and lightning bolts

Here's a picture of me next to an awesome Tardis. I also saw lots of Doctors but unfortunately none of them offered me a ride. So I'll just keep on blogging for you all in the meantime. I'm really exited to check out some of the bigger cons in Portland next year. It's going to be really hard deciding what my next costume should be though.

Nerdy for Nails with a Tardis at Eugene Comic Con- Eucon

Sunday, November 8, 2015

Inspired By Rainy Weather and Misty Trees

Misty Winter Tree Nail Art


Today's nails were inspired by a picture. It's been cloudy and raining off and on all day so when I was complaining about not knowing what to paint, my husband suggested something to match the weather. Coincidentally one of my nail groups has a running inspiration challenge where everyone paints nails based on a picture. I love this picture and today was the perfect day to match it. I've been enjoying views of mist and clouds in the trees outside my window. Good thing rainy weather is my favorite because I think we're going to be having a lot of it for a while.

Misty Winter Tree Nail Art

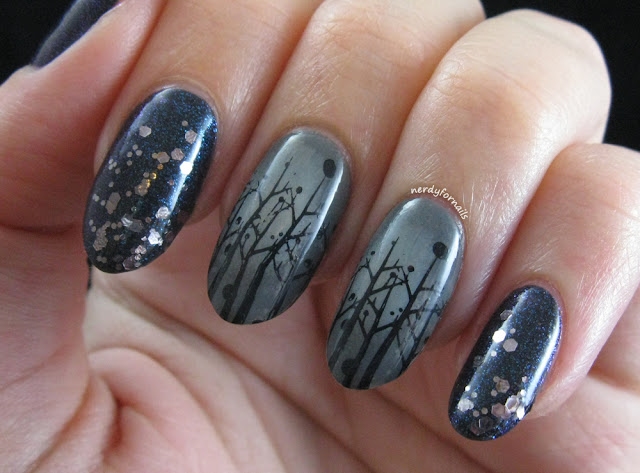
I did a radial gradient in shades of grey for my misty background using Five Rules and Intelligence, Integrity & Courage from the China Glaze Giver collection and Your Turn from Sinful Colors. I used Bundle Monster plate BM-407 for the trees with Mundo de Unas black stamping polish and then topped it with a pale grey jelly that I frankened. I don't think it shows up too much, but it was meant to give the trees a misty look. 

The other nails are two coats of Milani, Bella Blue. This one is a shimmer polish with a black jelly base which covers quite nicely in two coats. As you can see below the micro shimmer has a slight blue to purple shift. In regular light you mostly see a teal shimmer. I added silver glitter (Atomic Splash by Orly) to look like the the wet leaves that are catching the light in the picture. Overall I think this has the look of a dark misty forest.

Milani Bella Blue

Misty Winter Tree Nail Art

This was a really fun picture to replicate and now my nails go perfectly with the weather outside. I can't wait to enjoy them with the rain coming down outside all week.

Monday, November 2, 2015

Broken Glass Nails

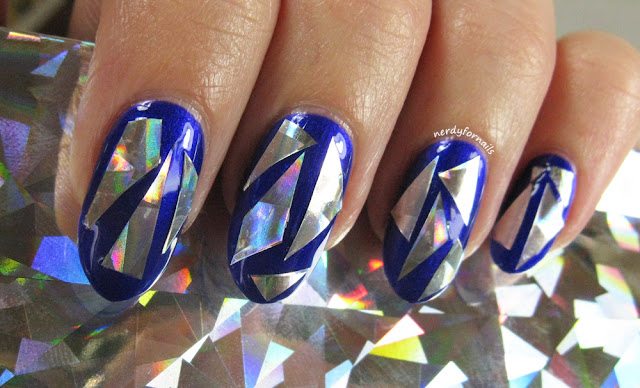
Broken Glass Nail Art with Sinful Colors Let's Talk

This broken glass thing has really been taking off lately. I'm not one to neglect the latest trends in nail art, so here's my version. This is actually a really easy and inexpensive look to create. I've been joking that I'm like a raccoon. I can't get enough of the shiny bits stuck to my nails. It's very disruptive to my productivity at work.

Broken Glass Nail Art with Sinful Colors Let's Talk

I started with two coats of Let's Talk from Sinful Colors. I'm kind of dying over how this polish is a perfectly rich shade of blurple- my most favorite nail polish color. The formula was a little thinner than I like and wanted to pool at the cuticles, but it was workable. Totally worth it for how vibrant this color is. 

My broken glass is holographic cellophane from Dollar Tree. Each package comes with 4 large sheets, so I don't think I'll ever be able to use it all up. First, I top coated my base color so it wouldn't bleed up over the "glass" bits. Next, I cut the cellophane into little bits following the shapes that were already outlined by the holo designs. I put top coat on my nails one at a time and stuck on the bits with tweezers to fill in my nails. Last I gave it two generous layers of top coat to make sure no corners were sticking up. The cellophane is pretty thin so it was easy to get it to lay flat against the nail unlike some run-ins I've had with mylar shards.

Broken Glass Nail Art with Sinful Colors Let's Talk

Broken Glass Nail Art with Sinful Colors Let's Talk

What do you think about this trend? Is it something you'd try?

Monday, October 26, 2015

Velvet Gradient and a Sparkly Spider

Black and Red Vampy Velvet Gradient with Spiderwebs and Rhinestone Spider

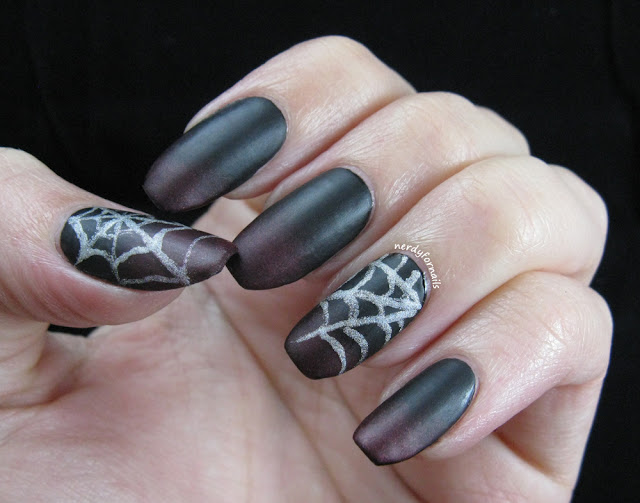
Halloween week continues with these dark and vampy spider nails. I did a similar look last year, and loved it so much I had to reinvent it again. This year I went darker and matte with new coffin shaped nails that I'm loving. I think it really completes the look.

Black and Red Vampy Velvet Gradient with Spiderwebs and Rhinestone Spider

Black and Red Vampy Velvet Gradient with Spiderwebs and Rhinestone Spider

Above I have a shot minus the spider which is really more accurate to how I'm wearing these nails because the spider came off less than three hours after I glued it. It was really cute for the photos, but the legs were catching on everything and it popped right off. I got the spider charm from Miss A (all the nail art supplies there are $1 each). 

My base color is Sinful Colors, Black on Black. I sponged on a gradient of Wet n Wild, Under Your Spell and Sation, Sparkling Ruby. I topped it off with Wet n Wild Matte Top Coat and then painted the web using Color Club, Harp On It for contrast.

Black and Red Vampy Velvet Gradient with Spiderwebs and Rhinestone Spider

This is my favorite Halloween look so far this year. I'm always a sucker for something dark and spooky (but you can't go wrong with spoopy either).

Saturday, October 24, 2015

Spoopy Halloween Nails

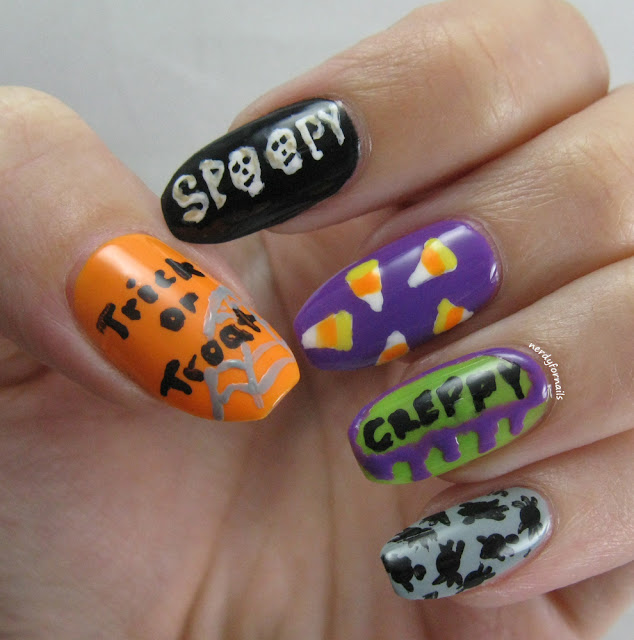
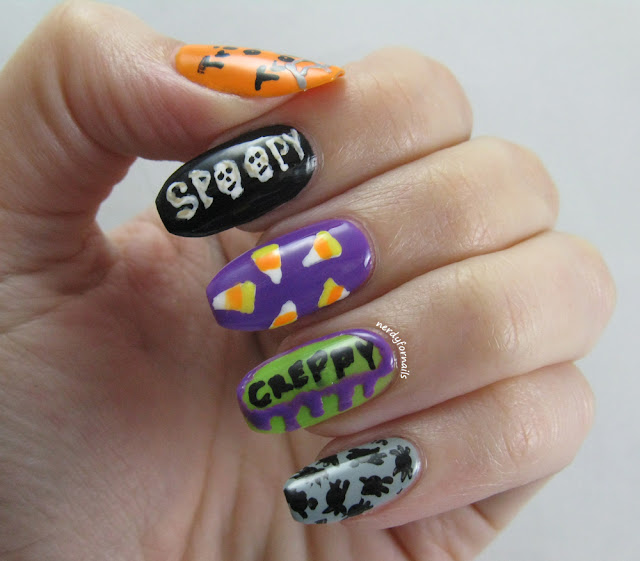
Spoopy and Creppy Halloween Nails (Trick or Troat)

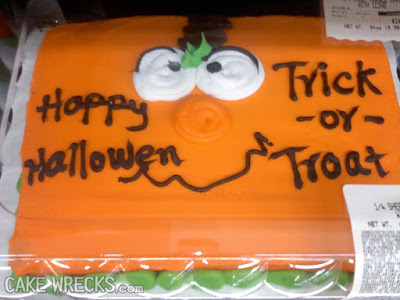
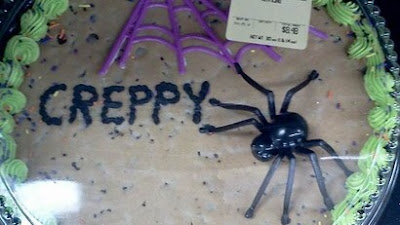
Much spoopy, so creppy! I did some nails that are perfect for trick or troating this Halloween. Oh, spoopy meme, you're everything that's right with cheaply imported Halloween goods and illiterate people who work in bakeries. 

Trick or Troat

Creppy


Spoopy and Creppy Halloween Nails (Trick or Troat)

These were so much fun to paint! I used quite a few colors, so don't get fritened if this gets a bit long.

Trick or Troat- China Glaze, Home Sweet House Music (orange) with China Glaze, Intelligence, Integrity & Courage and black acrylic paint for the lettering.

Spoopy- Sinful Colors, Black on Black with white acrylic paint for the lettering and Spoiled, Only in Creams for the shading.

Candy Corn- China Glaze, Plur-ple for the base. I drew triangles with white acrylic paint and then colored them in with Home Sweet House Music and Sally Hansen Insta-Dri in Expres-so Yellow.

Creppy- Wet n Wild, Stand the Test of Lime with Plur-ple for the drippy accents.
Smashed Spiders- China Glaze, Intelligence, Integrity & Courage for the base with black acrylic paint for the spiders.

Spoopy and Creppy Halloween Nails (Trick or Troat)

Spoopy


Spoopy and Creppy Halloween Nails (Trick or Troat)

My motto for Halloween this year:

Creppy in the streets spoopy in the sheets
I didn't make this, but whoever did is pretty much awesome.

Monday, October 19, 2015

Blingy Halloween Skulls

Orly Rebel Chic Kit w/ Skull Gems and Studs- Halloween Nails

For my next Halloween look I used the Rebel Chic kit from Orly. This is one of my all time best finds at Sallys. It was marked down to $4.99 already and I got it during the half off clearance sale, so about $2.50 for all of it! Everything in the kit goes so nicely together, although maybe not in as much excess as shown on the package. I've chosen to use just a few elements at a time for a more understated look. You can also check out this other manicure I did earlier with this kit to see another way to wear these elements.

Orly Rebel Chic Kit w/ Skull Gems and Studs- Halloween Nails

I mentioned it in my last post, but I'll say it again. Iron Butterfly, the polish that came in this kit is fantastic. I'm wearing two coats here. The formula is easy to apply and dries super fast. I really like the metallic shimmer with the matte finish. The only drawback is that the wear time is a little less than a typical polish before it starts chipping. I also had a bit of trouble keeping the skull on. The back is curved to help it lay flat on the nail which is great. It lasted about 3 days before it came off (I was being pretty rough with it). After it came off the first time I re-glued it 2 more times to extend the manicure, but it popped off much more quickly when I had to glue it over the residue that was left over from the first time.

Orly Rebel Chic Kit w/ Skull Gems and Studs- Halloween Nails

This is the kind of look I could wear any time of the year. In fact, I did this manicure in June and never got around to posting it until now. This is what I had on for my last day of work at my old job, and it felt so right. I miss everyone there, but I'm so glad I took the risk and moved on.

Orly Rebel Chic Kit w/ Skull Gems and Studs- Halloween Nails