Thursday, March 31, 2016

Lilac Whisper, A Nail Fail and My Thoughts on Anna Karenina

Nina Ultra Pro Lilac Whisper Swatch

I feel like I should apologize for another extended absence. I got the crazy flu that's been going around and had six days in a row where my temperature was over 100 degrees. I spent a lot of time napping and watching Netflix. Today is actually the first day I've gotten home after work and felt up to doing anything besides taking an hour long nap before dinner.

Let's take it nice and easy for my first day back with a swatch of a pretty Lilac color. The brush in this Nina Ultra Pro bottle seemed even wider than their normal gargantuan brush. I could almost coat my entire nail in one stroke. This made application a little tricky, but the formula was nice, with good coverage in two coats.

Nina Ultra Pro Lilac Whisper Swatch Nail Fail

Above you can witness my nail fail in which I tried applying metallic temporary tattoos to my nails. I found body-sized tattoos at the dollar store and thought it would be fun to try on my nails. I had to cut out the bits I liked to fit, then had trouble placing them on my nails. The one on my middle finger is way off center and too far down.. and what's going on with the ring finger... is it wearing a bow tie? A sad, sad bow tie that decided life wasn't worth living and tried to bleed out all its color with the top coat. The thumb might have been cool, except like most foils these things decided to wrinkle up when I applied top coat. I'm still on the quest to find one that doesn't ruin nail foils. The lilac was so pretty by itself I was really wishing I'd left it alone.

Anna Karenina

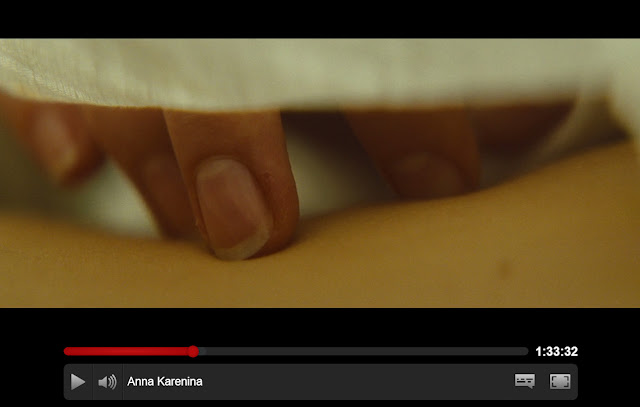
While I was painting these nails I was watching Anna Karenina so now you must all be subjected to my highly educational and serious book/movie review. I couldn't help noticing that Anna's cuticles are a bit dry. I guess those are the perils of winter in Russia! I read the book (or should say finished reading) sometime last year. I started it around Christmas 2013 and it took an absolute eternity for me to push through and finish the thing. I read bits and pieces off and on throughout 2014 and finally kicked my butt into gear to finish it around April of 2015. I kept feeling like there would be some grand epiphany, but the book pretty much ended the same way it started. Some stuff happened, then some more stuff happened and some people did a bunch of stuff. They talked about things and had philosophical ideas. Anna is in it.. part of the time. You'll meet some other guys too. The movie is a condensed version that leaves out a ton of plot points from the book. I thought it was fairly well done and had a very Baz Luhrmann feel to the directing (it wasn't Baz, I checked.. again). I'm mostly happy if the movie can avoid changing the plot entirely which this movie achieved. I can't really blame them for leaving things out. That book was seriously long! I never felt bored while reading, but I also never felt inspired to pick the book up when I wasn't reading. I'm glad I got through it and I'm sure it's a beautiful work of art, but I can't find the motivation to say I "loved" it. It was an experience and one I'm glad I've had if only to say I did it. 
The End (hope you enjoyed my novel too).

Thursday, March 17, 2016

Seven Days of St Patrick's: Rainbow Water Marble Nail Art

St Patrick's Day Rainbow Water Marble Nail Art with Zoya Ivanka

I've just survived a harrowing ordeal. Apparently Comcast decided randomly at 8:26 last night that they were going to stop supporting our modem and we were cut off from the glory of the internets. We were without access for nearly 24 hours. It was a traumatic and distressing time, but I've pushed through to bring you this post for a late for St. Patrick's Day. The new modem is up and running and hopefully we'll have another spectacular ten years of internet access before they decide my equipment is obsolete again.

St Patrick's Day Rainbow Water Marble Nail Art with Zoya Ivanka

I've been waiting for St. Patrick's Day to use one of my newest Zoya purchases, Ivanka. I'm wearing three coats on all but my ring finger which got a rainbow water marble. Ivanka is much more magical than these pictures would suggest. It has a foil finish that reflects a lot of light. The polish itself is a green jelly filled with tons of micro glitter. I had full coverage in two coats, but wanted the third for the extra shine. 

I made water marble decals using most of the neons from the China Glaze Electric Nights collection plus Seeing Red from The Giver collection. This method is so much easier for me to create and apply than dipping my nails into the water. I even added bits of the decals on the under side of my nails for an extra fun twist.

St Patrick's Day Rainbow Water Marble Nail Art with Zoya Ivanka

St Patrick's Day Rainbow Water Marble Nail Art with Zoya Ivanka

I tried this out last year as well and wanted to do an updated version. My rainbow water marble wasn't as bad as I remembered it being, but I think I definitely have a better handle on this technique a year later.


Tuesday, March 15, 2016

Seven Days of St Patrick's: Nails Inc, Spitalfields

Nails Inc- Spitalfields- Green Magnetic Fishnet Patterned Polish- St Patrick's Nail Art

For day five of the challenge (or day two for me) I have Spitalfields by Nails Inc which is a shimmery green magnetic polish. I found this one at Marshal's for the ridiculously low price of 93 cents. Crazy considering that it retailed for about $15 when it first came out. I wasn't previously much into the magnetic polish trend, but the fishnet pattern caught my eye. Plus everyone at work pretty much though it was witchcraft that I did this with a magnet, so that's a win for me.

Nails Inc- Spitalfields- Green Magnetic Fishnet Patterned Polish- St Patrick's Nail Art

The instructions say to paint a thin coat on all your nails first and let it dry. Next, doing one nail at a time, paint a slightly thicker coat and hold the magnet just above the surface of the polish for a few seconds. 

I feel like magnetic polish is an easy way to get some pretty intricate looking nail art. I messed up on a few nails and blurred the image or only got half the nail, but it was easy to paint a fresh layer on top and try the magnet again. The end result is a look with lots of depth and interest.

Nails Inc- Spitalfields- Green Magnetic Fishnet Patterned Polish- St Patrick's Nail Art

Here's what the other ladies have come up with for day five:


Monday, March 14, 2016

Seven Days of St Patrick's: Army Green and Gold Chevron Nails

Army green nails with gold stamped chevrons


Staying true to my lazy nature... I am starting the 7 Days of St. Patrick's Day Nail Art challenge three days late! It's a relaxed challenge with the freedom to come and go as you please (thank goodness) and as far as I can tell the only rule is that the polish has to be green or St. Patrick's themed. This is definitely my kind of challenge. Huge thanks to Krystal of Polish Galore for putting this whole thing together.

Army green nails with gold stamped chevrons

For day 4 I have a toned down army inspired look. This is one of my all time favorite so ugly it's pretty polish colors- Don't Get Derailed by China Glaze. It's a really dark brownish green colored cream polish. The formula is a little on the thinner side, but overall applies easily. I'm wearing two coats here. 

I stamped with Bundle Monster plate BM-604 and Maybelline Color Show polish in Bold Gold. I'm dying to get my hands on one of those clear squishy stampers to make placing images like this easier. I didn't do too bad with my regular stamper, but I could definitely see the advantage in having a clear one.

Army green nails with gold stamped chevrons

Check out all the other awesome green nails for today:


Sunday, March 6, 2016

Loreal Revitalift Volume Filler Review


Usually it's months and months in between VoxBoxes so I was happily surprised to be chosen for the L'Oreal Revitalift VoxBox at the same time as the Dry Spray box. This box came with four different Revitalift products to be used at different times of the day. The secret ingredient is hyaluronic acid which is supposed to help give skin that youthful looking fullness. Of course skin produces less of this ingredient on its own as we age, so this line of skin care products has been developed to help add some of it back.

I've always been told I look young so it's hard to face the truth that my skin is starting to betray my age. I miss the days when people said I could pass for 20 and now I'm not even getting carded half the time. My main problem is the little horizontal lines that run under my eyes. Where do these things even come from? Do I go around squinting all day without realizing it?

For someone with a 30 second beauty routine that consisted of washing my face and using one moisturizer, it was a bit overwhelming to open up all these products. Why the heck do I need four products that all do the same thing?? I wanted to give it a fair shot and I've learned a lot in the process. I've tried to be a lot more conscious about treating my skin better. I'm trying to be diligent about actually removing leftover eye makeup instead of lazily ignoring it, and patting on products gently instead of rubbing and stretching the skin.


Step 1: Each morning I wash my face. L'Oreal makes a Revitalift Cream Cleanser, but that didn't come with my sample box so I stuck with my normal gentle cleanser. 

Step 2 is the Revitalift Day Cream pictured above. Pro: it absorbs quickly. It seems to leave my skin with an almost powdery feeling finish. I'm not sure what that means or if it matters, but my skin does feel sufficiently hydrated and not at all oily after using it. Con: It's hard for us long nailed girls to get the cream out of the pot. I usually try to scoop it out on the top side of my nail rather than the under side so I don't waste product stuck under my nails. It's not really a big deal now while the pot is full, but I'm a little worried that it will become more of a hassle the farther down I get.

Step 3 is the day-time volume filler eye treatment which is the smallest tube in the top picture. A tiny amount is all you need to dab around the eye area. It absorbs super quickly so I can move right on to applying the rest of my eye makeup


Step 4 is the night cream. It comes in a tube (hooray). When I get home from work I wash my face again and then apply the night cream. I use just a bit more than what I've shown above to cover my whole face. My favorite part: it's tinted slightly lavender. Purple and grey are my two favorite colors so L'Oreal is spot on with the packaging.


Step 5: The volumizing concentrated serum. It comes in this fun syringe-like tube that you dispense by pushing the button at the bottom. Like the other eye treatment, a little bit goes a long way. I dab some around my eyes each night and that finishes up the routine. None of this takes much longer than what I was doing before. After I figured out what each of the products was for, it's actually relaxing to spend a few extra seconds each day pampering myself.

All of the products feel good on my skin and are a good quality. I'm one of those lucky adults who still gets breakouts like a teenager. I can't say that the creams have magically cleared it all up, but they definitely haven't irritated my skin or made it worse.

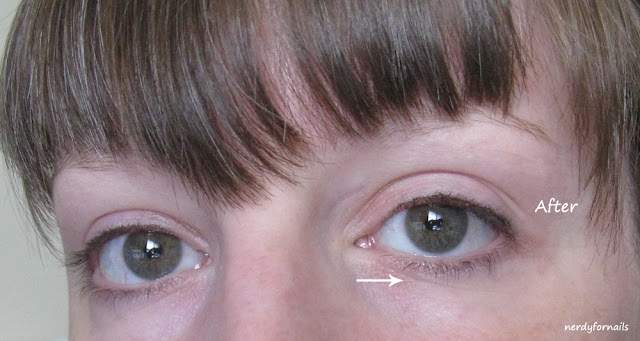
The most important question is whether or not the Revitalift products really work to volumize skin and fill in stubborn lines. I've taken0 before and after pictures with no makeup and no touch-ups to show my results. It's hard to get exactly the same lighting and angle, but I think these pictures come close enough to show a truthful before and after. The after picture was taken about four weeks after I started using the products and I've used them all as directed each day.


Fun fact: I have a scar in the inner corner of my left eye that I got as a baby when a drunk guy decided to punch through a window. My mom happened to be standing nearby holding me and I was cut by a shard of glass. I never try to cover it up because it isn't very noticeable and even if it was, it's kind of an awesome story.
The lines are still visible to me in the after picture, but I do think the skin around them looks a bit plumper and the lines a bit less deep and creased. Do you think the difference is noticeable enough to justify a purchase?

I always tend look at products through a budget-minded filter. The pricing on Amazon is $15-$25 each depending on which of the four products you're looking at. I know anti-aging products can be quite pricey, so this doesn't actually seem too expensive, especially since I do feel like I've seen some measurable results. I'm going to continue my experiment over the next few months to see if my results become even more pronounced and I'll let you ladies know.

If you want to learn more about these products check out L'Oreal's Website and if you want to join Influenster and test out products for yourself let me know and I'll send an invite your way.

The legal stuff: I received these products complimentary from Influenster for testing purposes.