Showing posts with label Sinful Colors. Show all posts

Monday, January 9, 2017

New Year, New Galaxy Nails

New Year's Galaxy Nails with Swarovski crystals 2017

Look at that... I'm only 9 days late on my New Year's nails. As usual I have no resolutions this year. Either I'll be completely awesome as  intended or the mundane details of adult life will drag me into a comfortable mediocrity. No sense getting all philosophical about it.


New Year's Galaxy Nails with Swarovski crystals 2017

I sponged a galaxy type design using a ton of different polishes. LA Colors- Reckless; EverGlaze- Royal Satin; Sinful Colors- Let's Talk, Dream On; Orly- Saturated; China Glaze- Pool Party, Home Sweet House Music, Fairy Dust. The real reason for this design was to match these fantastic Swarovski crystals. They color shift depending on the angle so I tried to pick up all the colors from the crystals in my galaxy. The cream color on the accent nail is OPI, My Vampire Is Buff.

New Year's Galaxy Nails with Swarovski crystals 2017

What are your predictions/resolutions for 2017?

Sunday, December 25, 2016

Christmassy Marble Nails

Marble Christmas nails

I was seriously considering "Marblous Christmas Nails" as my title for this one. So bad! I need to get more sleep for sure. 

Marble Christmas nails

Even the right hand turned out pretty good. 

Marble Christmas nails

These nails were inspired by my latest home renovation project (and the Nailasaurus marble nails tutorial). The red nails are China Glaze, Seeing Red. The marble nails are Sinful Colors, Snow Me White and Black

Bathroom remodel marble countertops

Marble Christmas nails

Happy holidays everyone!

Wednesday, October 26, 2016

It's been a scary long time..


Hey kids, want to hear a scary story?  Shines flashlight on face... It all started about three months ago. I may have mentioned that we embarked on a harrowing journey to find the house of our dreams. Well, we did indeed find a house. The location is almost perfect- close enough to work but far enough away from the neighbors, tall trees, almost enough space to satisfy my hoarding tendencies. But the dream quickly turned to a nightmare when I discovered that the internet doesn't exist here..... Let that sink in for a moment... No. Internet.

To be fair we could technically pay twice as much as we were before to get satellite internet with a data cap of 10g per month. Sounds great except the part where I used to use about that much data every day or so. I'm currently attempting my first ever phone only blogging experience. Pros: I'm blogging on the couch! Cons: every single other thing. 


So, I still do nails but it's been really hard to keep blogging. Thanks Google for cancelling the Blogger app for iOS and forcing me to struggle through this mess on my mobile browser. 

These are my rotting zombie Halloween nails. I started with one coat of China Glaze, Don't Get Derailed, then dry-brushed black polish in random places. Next I used a q-tip soaked in acetone to rub off layers of polish is a few places on each nail. I topped it off with Wet n Wild matte top coat. After that was dry I painted on some blood (Sally Hansen, Brick Wall) and left that part shiny. 

Any thoughts on this new format? Is the picture quality ok? I can't tell since I'm only seeing it on my tiny phone screen. It's a work in progress, but I'm happy to be back. 

Sunday, May 8, 2016

Chevron Negative Space Nails

Chevron Negative Space Nails

The idea for these nails popped into my head randomly last weekend and I decided to go with it. I know it's supposed to be spring but I've been craving grey and black polish lately. Seasons can't define my nail looks! I really love how the negative space nail came out and wish I had done all my nails this way instead of these crazy skittles. What do you think of this mismatched look?

Polishes/supplies used: 
Essence, As Long As You Love Me
Sinful Colors, Black On Black
Chevron Nail Vinyls

Chevron Negative Space Nails

Wednesday, April 6, 2016

April 6: National Tartan Day- Plaid Nails

April 6th: National Tartan Day Plaid Nails

Today is National Tartan Day. I had to look it up. This is actually an American holiday celebrating the Scottish Declaration of Independence which our own Declaration was modeled on years later. You can read all about it here. This is a stroke of good luck because I'm going to a Scottish festival with my uncle this weekend. My family comes from Clan Donnachaidh and of course we have our own tartan which I have attempted to paint on my nails. I didn't get a ton of detail in there with my hand painted lines, but the colors are approximately right. Y'all need to remind me to finally spring for that stamping plate with all the plaid patterns on it. That would have come in really useful for this challenge.


April 6th: National Tartan Day Plaid Nails

I started with two coats of NYC, Carnival Red. For the green lines I used Spoiled, Permission to Proceed which is a bright green jelly. For the blue I diluted Sinful Colors, Endless Blue with some clear polish to make it more jelly-like. I was hoping the jelly colors would overlap differently giving this look some dimension. It worked better with the green than the blue, but I'm happy with the overall effect.

April 6th: National Tartan Day Plaid Nails


Saturday, April 2, 2016

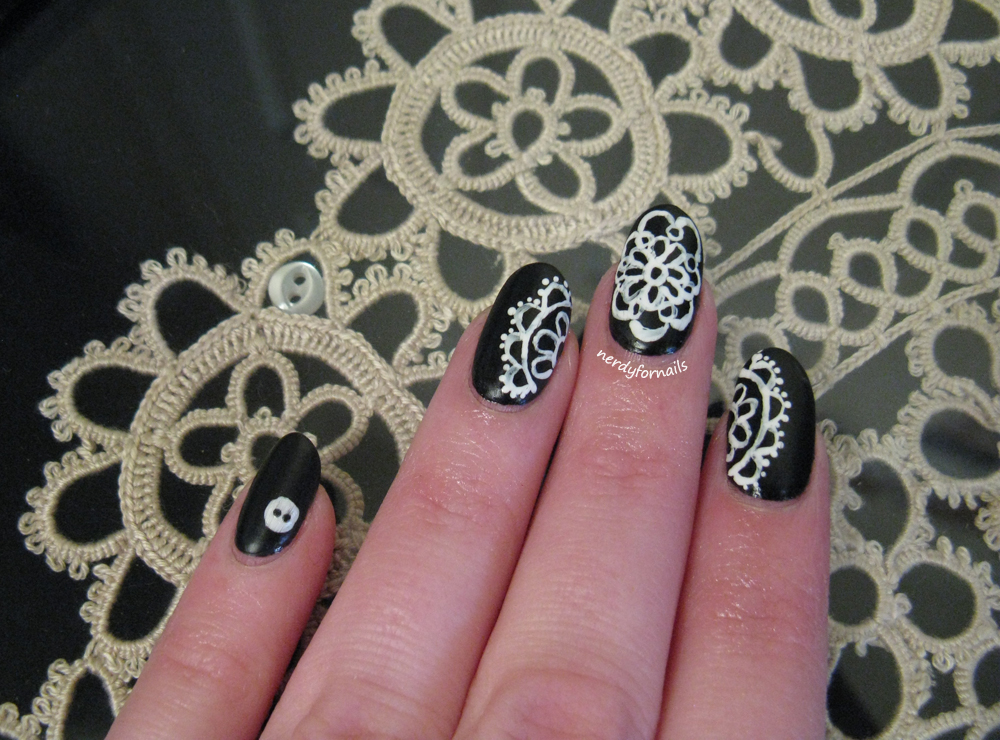
April 1- International Tatting Day Nails

International Tatting Day Tatted Nails April 1

I know, I'm a day late, but I couldn't resist painting some nails for International Tatting Day. Katherine of Procrastinails has put together a really interesting challenge for April. The challenge prompt each day is inspired by a unique holiday during the month of April. If you'd like to join check out the 30 Days of Colour group on Facebook and jump in any time.

30 Days of Colour April 2016 Unique Holidays Challenge

A few years back my grandma found some awesome framed tatting pieces at an estate sale that she thought would be perfect in my apartment. My grandma is hands down the best curator of interesting antiques and home decor, and she was right. I love these tatting pieces. Wikipedia seems ignorant of this fact, but grandma says that each framed piece has to have a button hidden somewhere within the lace. Both pieces she gave me have a tiny hidden button, so there has to be some truth to it. I painted a "hidden" button to go with my tatting nails so they could match.

International Tatting Day Tatted Nails April 1

Framed Tatting

 I have another smaller piece that's buried somewhere after the move, but couldn't be bothered to find it. When these pieces came to me they had glossy brown frames and 70's-tastic brown velvet backing. I fixed them up with some new fabric and a can of spray paint to make them a bit more modern and they hung on my wall through three different apartments before we came here. The move was a little overwhelming so not everything got unpacked, but I'm excited to take them out someday and give them their proper place on my wall.

For my nails I used Sinful Colors Black on Black and free handed a design similar to my tatting piece with white acrylic paint. I topped it off with a coat of Wet n Wild Matte Top Coat.

International Tatting Day Tatted Nails April 1


Sunday, February 21, 2016

Neon Galaxy Squishy Marble Nails

Neon Galaxy Squishy Marble Nails- Inspired by a car

Neon Galaxy Car- credit unknown

Neon Galaxy Squishy Marble Nails- Inspired by a car

That car... no words.. so.. universe.. sparkly.. I need that car in my life. Since the blog life is not turning out to make me rich, the next best thing was to give my nails a similar paint job. I had a rough week and I think I can attribute 90% of it being ok in the end to taking a deep breath and staring at my fingertips. 

These nails are so magical that even my right hand turned out amazing. Squishy marble is a genius technique. I've read of some people putting the blobs of polish directly on their nail and squishing with a stamper, but that seems to make the whole thing pull up for me leaving sad bald spots. I prefer starting with a white base coat, dotting the blobs on a piece of plastic and then squishing onto the nail. That way you can get an idea of where the colors are and line them up where you want them on your nail. I squished on a couple overlapping layers of color to create this dimensional neon galaxy look.

I used: China Glaze- Too Yacht To Handle, CG- UV Meat To Be, Sinful Colors- Endless Blue, Orly- Saturated, CG- Violet Vibes and CG- Plur-ple. I used a dotter to add some stars in white and topped it off with Fairy Dust. 

Neon Galaxy Squishy Marble Nails- Inspired by a car

Sunday, January 24, 2016

Quilted Glitter Chevron Nails

Quilted Nails with Chevrons and Glitter + Nina Ultra Pro Polish & Nail Vinyls

I'm enjoying another beautiful rainy day inside, about ready to get started on some new nails for the week. I'm kind of wishing I could be snowed in like the East Coast, but I'll take what I can get. I've been feeling indecisive about what to paint on my nails the last few weeks. Is there anything you've been wanting to see. Let me know!

Quilted Nails with Chevrons and Glitter + Nina Ultra Pro Polish & Nail Vinyls

I've combined a few things for these skittle nails. I started with two coats of Nina Ultra Pro, French Pink (my absolute favorite nude for my skin tone) as the base for the rest of the art.

 I've been wanting to try out a quilted nail for such a long time. It was a little tricky getting the lines straight! I used my old library card because it was flexible and I thought it would be easier to bend it around my nail, but I think the flex of the card made some of my lines a little wiggly. I waited a few minutes till the polish was almost dry, but still dentable and then pressed the card along the nail in a criss-cross pattern. I placed a piece of glitter at each intersection to tie it in with the other glitter nails. 

I used my chevron Nail Vinyls to block off different parts of my nails and painted either a coat of Sinful Colors, Black on Black or sponged on several coats of Nina Ultra Pro, Gilded, which is a really pretty pink-toned holo glitter.

I couldn't decide which color of background I liked best with these nails. What do you think?

Quilted Nails with Chevrons and Glitter + Nina Ultra Pro Polish & Nail Vinyls

Wednesday, January 13, 2016

Pantone Color of the Year 2016: Rose Quartz & Serenity Nail Art

Pantone Color of the Year 2016 Rose Quartz & Serenity Beachy Nail Art Gradient with Pearls and Gold Glitter


This definitely falls in the "sorry, not sorry" category. I've been taking an unintentional, but apparently much needed break from my blogging. I just hadn't been feeling it and keeping busy with so many other things. This week I've been feeling the urge to blog again, so I'm happily back at it. I hope the motivation keeps up because I've been painting a ton of great stuff and the internet needs more nails.

I was fully expecting to hate this manicure. For the last couple years I've done nails inspired by the Pantone Color of the Year (check out 2014 and 2015) and I didn't want to stop the tradition now, but barf... Pantone chose not one, but two of my least favorite colors. I tend to like dark or bold shades the most so I wasn't thrilled for these pastel baby colors. The explanation for why Pantone chose these is mildly interesting. Apparently they think we're all a bunch of stressed out crazy people in search of some relaxation (seriously paraphrasing here), so they chose these soothing colors to reflect increased mindfulness in 2016.

To my great surprise I love how this turned out. The colors make me think of a beach sunrise with the gold sand and pearls. The softness of the colors really works with the overall look and feel of the manicure.

Pantone Color of the Year 2016 Rose Quartz & Serenity Beachy Nail Art Gradient with Pearls and Gold Glitter

I love having a different color on the bottom side for an added twist. I did lavender underneath with a hidden pearl.

Pantone Color of the Year 2016 Rose Quartz & Serenity Beachy Nail Art Gradient with Pearls and Gold Glitter

I started with two coats of Love & Beauty in Light Blue, then sponged several layers of Sinful Colors, Easy Going onto the tips. I did a layer of top coat and sprinkled loose gold craft glitter from Michael's along the sides of each nail. I also placed larger glitters and pearls from Born Pretty in random places to complete the look. 

On the bottom side I used two coats of Sinful Colors, Candy Coated.

Pantone Color of the Year 2016 Rose Quartz & Serenity Beachy Nail Art Gradient with Pearls and Gold Glitter

What do you think about Pantone's choices this year? This manicure may have grown on me, but I don't think I'll be running out to buy pants in these colors anytime soon.

Thursday, December 31, 2015

New Years Nails: 2016

Smoosh Art New Years Nails 2016

Happy New Years! I'm so excited about the three day weekend. 2015 was a great year for me, and I'm looking forward to things getting even better in 2016. I'm starting things off right in the new year with some of the easiest nail art and Fairy Dust! I finally bought it on sale at Sally's and I'm so glad. It's just the right amount of sparkle without overwhelming the art underneath. I'm also back to coffin shaped nails which I loved when I tried them at Halloween. I think I might keep this shape for a while this time.

Smoosh Art New Years Nails 2016

Do you see what I did here? Count the number of studs on each finger and you'll see why these are my New Year's nails.

To create this look I dotted blobs of nail polish onto a plastic sheet and smooshed them with my stamper, then pressed onto my nails. I did a couple layers on some nails to get full coverage and give more depth. It's really easy to get an interesting an fun look with this technique. I'm sure it already has a name, but I'm calling it smoosh art.

Smoosh Art New Years Nails 2016

I also picked up My Vampire is Buff by OPI on clearance at Sally's which I used as my base for this manicure. From the way everyone talks about how amazing this polish is, I expected the formula to be better. My first coat was really streaky and the brush dragged at the color. The second coat fixed the streaks, but I was a little disappointed to see them in the first place. For my color blobs I used shades of purple and teal. 
Sinful Colors- Dream On
China Glaze- Plur-ple, Violet Vibes, Queen B and Too Yacht to Handle
Island Girl- Aloha Paradise
Orly- Saturated
The two different sizes of studs are from Born Pretty. I topped it all off with Fairy Dust from China glaze and my favorite top coat.

Smoosh Art New Years Nails 2016

 Are there any nail shapes or trends you're looking forward to trying in the new year? I think I'd have to answer "all of them." I love the challenge of trying new things.

Thursday, November 26, 2015

Pumpkin Pie Nails


Happy Thanksgiving! I'm about to rush off to family dinner where we're having pizza instead of turkey, and no pumpkin pie, but that's really fine with me since I don't actually like pumpkin pie. I do like turkey, but what a lot of work. Maybe next year. I think it looks much tastier on my nails than my plate. My favorite is chocolate silk and homemade whipped cream. Do you have a favorite/least favorite pie?


I found this perfect pumpkin pie shade- Spat! from LA Colors recently at Dollar Tree. I'm usually really impressed with these polishes for the price, but this one had a terrible formula. It was really streaky and took 3 coats to cover completely. It dried with a slightly matte finish like a neon, but did dry reasonably fast. My pie crust is Finger Paints, Don't Make A Scene with shading in Spoiled, Pumping Gas. The whipped cream is Sinful Colors, Snow Me White with Spoiled, Pearly White Teeth accents.


Monday, November 2, 2015

Broken Glass Nails

Broken Glass Nail Art with Sinful Colors Let's Talk

This broken glass thing has really been taking off lately. I'm not one to neglect the latest trends in nail art, so here's my version. This is actually a really easy and inexpensive look to create. I've been joking that I'm like a raccoon. I can't get enough of the shiny bits stuck to my nails. It's very disruptive to my productivity at work.

Broken Glass Nail Art with Sinful Colors Let's Talk

I started with two coats of Let's Talk from Sinful Colors. I'm kind of dying over how this polish is a perfectly rich shade of blurple- my most favorite nail polish color. The formula was a little thinner than I like and wanted to pool at the cuticles, but it was workable. Totally worth it for how vibrant this color is. 

My broken glass is holographic cellophane from Dollar Tree. Each package comes with 4 large sheets, so I don't think I'll ever be able to use it all up. First, I top coated my base color so it wouldn't bleed up over the "glass" bits. Next, I cut the cellophane into little bits following the shapes that were already outlined by the holo designs. I put top coat on my nails one at a time and stuck on the bits with tweezers to fill in my nails. Last I gave it two generous layers of top coat to make sure no corners were sticking up. The cellophane is pretty thin so it was easy to get it to lay flat against the nail unlike some run-ins I've had with mylar shards.

Broken Glass Nail Art with Sinful Colors Let's Talk

Broken Glass Nail Art with Sinful Colors Let's Talk

What do you think about this trend? Is it something you'd try?

Monday, October 26, 2015

Velvet Gradient and a Sparkly Spider

Black and Red Vampy Velvet Gradient with Spiderwebs and Rhinestone Spider

Halloween week continues with these dark and vampy spider nails. I did a similar look last year, and loved it so much I had to reinvent it again. This year I went darker and matte with new coffin shaped nails that I'm loving. I think it really completes the look.

Black and Red Vampy Velvet Gradient with Spiderwebs and Rhinestone Spider

Black and Red Vampy Velvet Gradient with Spiderwebs and Rhinestone Spider

Above I have a shot minus the spider which is really more accurate to how I'm wearing these nails because the spider came off less than three hours after I glued it. It was really cute for the photos, but the legs were catching on everything and it popped right off. I got the spider charm from Miss A (all the nail art supplies there are $1 each). 

My base color is Sinful Colors, Black on Black. I sponged on a gradient of Wet n Wild, Under Your Spell and Sation, Sparkling Ruby. I topped it off with Wet n Wild Matte Top Coat and then painted the web using Color Club, Harp On It for contrast.

Black and Red Vampy Velvet Gradient with Spiderwebs and Rhinestone Spider

This is my favorite Halloween look so far this year. I'm always a sucker for something dark and spooky (but you can't go wrong with spoopy either).

Sunday, August 9, 2015

Looking On the Bright Side

Orly Key Lime Twist Skittlette with Stamping and Mirror Ball

If you've been keeping up with recent posts then you've already read all about my adventures in moving and getting a new job. I was so relieved to find out I could keep painting my nails any crazy way I like so I celebrated with this super bright skittlette. Things are finally starting to look up after going through a lot of stress. I was able to schedule some time off work to go back and help move my husband and cat and incredible amounts of stuff. The U-Haul is reserved and I'm so glad I only have to wait another week and a half. It was starting to feel like I may never see them again, but then I am kind of dramatic.

Orly Key Lime Twist Skittlette with Stamping and Mirror Ball

For my skittlette I used Key Lime Twist and Mirror Ball from Orly. Key Lime Twist has a pretty good formula for such a bright neon. I used three coats to even out a tiny bit of streaky-ness and make it look super bright. I also used three coats of Mirror Ball for extra holo coverage. My stamped nail is two coats of Sinful Colors, Snow Me White with Mundo de Unas black stamping polish and Bundle Monster plate BM-604. I stuck on an iridescent rhinestone from a pack I got on eBay to finish it all off.

Below is a shot in the sun to show off the holo and how bright this Orly polish is. These were really fun to wear and were almost enough to cheer me up from missing my family and old home. Soon, it will all be worth it. :)

Orly Key Lime Twist Skittlette with Stamping and Mirror Ball