Showing posts with label challenge. Show all posts

Thursday, April 28, 2016

April 28- International Astronomy Day- Nebula Nails

April 28- International Astronomy Day- Nebula nails with constellations

Happy International Astronomy Day. My inspiration today comes from the challenge prompt itself. I loved the swirly nebula colors and wanted to recreate it on my nails. I've always been fascinated by the idea of space and what may be out there. It's crazy how we're able to see objects that are so far away just enough to create more mysteries than we're able to solve. If space travel became a reality in our lifetime I'd be tempted to buy a one way ticket!


To add to the astronomy theme I've painted some popular constellations on each of my nails. From thumb to pinkie I have Orion, Cepheus, Little Dipper, Cancer and Ares. I sponged on the nebula using bunch of neon colors from the China Glaze Electric Nights Collection- Glow With The Flow, Home Sweet House Music, DJ Blue My Mind and Violet-Vibes as well as Fuzzy Dice from Spoiled. I topped it off with Fairy Dust (probably mandatory for any space manicure) and painted the constellations using a dotting tool for the stars and a small paintbrush to connect the dots.

April 28- International Astronomy Day- Nebula nails with constellations

Do you have a favorite constellation?


Tuesday, April 19, 2016

April 19- National Garlic Day- Garlic Nails

National Garlic Day Garlic Pattern Nails

National Garlic Day y'all!! I know I got pretty fake excited over Big Wind Day, but my excitement for Garlic Day is completely genuine. Garlic all the things! 

Garlic is my absolute favorite seasoning for foods. I put it in everything. Not sweets. That's just weird. I guess I probably could have stuck garlic cloves to my nails as a jokey manicure for today, but I couldn't waste the precious garlic. Instead I've painted a cute garlic pattern onto each of my nails. I had to quiz my husband... "Honey, what does this look like?" He looks for a few seconds.. "Umm.... garlic?" he says, with a terrified look like if he's gotten it wrong I'll probably have a meltdown case of nail rage. But of course he's right because every nail design I think up in my head comes out perfectly on my nails the first time every time. Isn't that how it works for every blogger?

National Garlic Day Garlic Pattern Nails

For my delicious garlic nails I've used China Glaze, Life Preserver as my base. The formula was a little thin and runny on this one, but manageable. I got good opaque coverage in two coats. I hand-painted the garlics with a small nail art brush by layering two tan colors, OPI, My Vampire is Buff and Finger Paints, Don't Make a Scene. I outlined them and drew in the cloves with Spoiled, Pumping Gas.

I had just finished painting and was taking the first of my nail pictures when I heard from the kitchen the distinctive sound that is the papery skin being torn off the perfect garlic I'd painstakingly chosen at the store that morning. Nooooooooooo.... I needed that for my pictures!!!! Well, at least the painting went reasonably well. I got a photo with what was left of my magnificent head of garlic and I got to eat it with dinner, so life isn't too bad.

National Garlic Day Garlic Pattern Nails

Tuesday, April 12, 2016

April 12: Big Wind Day- Wind Gust Inspired Nails

National Big Wind Day Nails

Try to contain yourselves... it's the holiday we've been waiting for all year long... National Big Wind Day! According to this totally official looking website Big Wind Day commemorates the highest wind gust ever recorded on Earth's surface, coming in at 231 mph. Wow. This is exciting stuff. Today didn't happen to be a very windy day here so we're not breaking any records this year, but I have high hopes for next April.

National Big Wind Day Nails

To celebrate I've painted some nails with gusty looking wind inspired stamping. This is two coats of Color Club, Over the Moon. I stamped with Bundle Monster plate BM-312 and Mundo de Unas white stamping polish. Below we have the obligatory holo in the sun photo.

National Big Wind Day Nails

30 Days of Colour Unique Holidays Challenge


Wednesday, April 6, 2016

April 6: National Tartan Day- Plaid Nails

April 6th: National Tartan Day Plaid Nails

Today is National Tartan Day. I had to look it up. This is actually an American holiday celebrating the Scottish Declaration of Independence which our own Declaration was modeled on years later. You can read all about it here. This is a stroke of good luck because I'm going to a Scottish festival with my uncle this weekend. My family comes from Clan Donnachaidh and of course we have our own tartan which I have attempted to paint on my nails. I didn't get a ton of detail in there with my hand painted lines, but the colors are approximately right. Y'all need to remind me to finally spring for that stamping plate with all the plaid patterns on it. That would have come in really useful for this challenge.


April 6th: National Tartan Day Plaid Nails

I started with two coats of NYC, Carnival Red. For the green lines I used Spoiled, Permission to Proceed which is a bright green jelly. For the blue I diluted Sinful Colors, Endless Blue with some clear polish to make it more jelly-like. I was hoping the jelly colors would overlap differently giving this look some dimension. It worked better with the green than the blue, but I'm happy with the overall effect.

April 6th: National Tartan Day Plaid Nails


Saturday, April 2, 2016

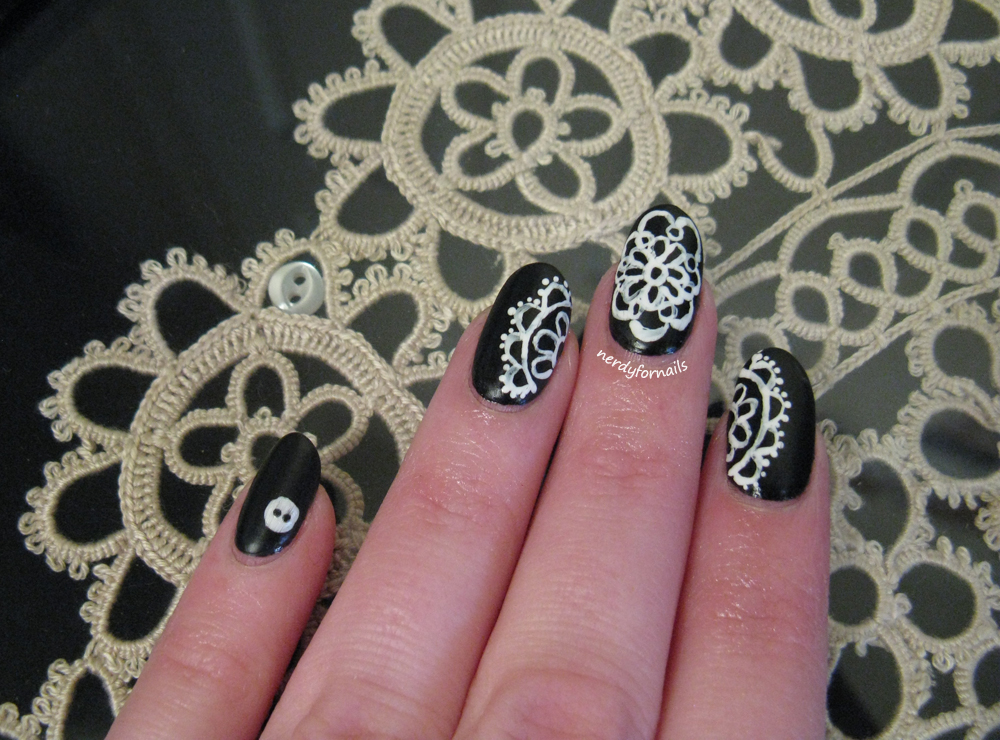
April 1- International Tatting Day Nails

International Tatting Day Tatted Nails April 1

I know, I'm a day late, but I couldn't resist painting some nails for International Tatting Day. Katherine of Procrastinails has put together a really interesting challenge for April. The challenge prompt each day is inspired by a unique holiday during the month of April. If you'd like to join check out the 30 Days of Colour group on Facebook and jump in any time.

30 Days of Colour April 2016 Unique Holidays Challenge

A few years back my grandma found some awesome framed tatting pieces at an estate sale that she thought would be perfect in my apartment. My grandma is hands down the best curator of interesting antiques and home decor, and she was right. I love these tatting pieces. Wikipedia seems ignorant of this fact, but grandma says that each framed piece has to have a button hidden somewhere within the lace. Both pieces she gave me have a tiny hidden button, so there has to be some truth to it. I painted a "hidden" button to go with my tatting nails so they could match.

International Tatting Day Tatted Nails April 1

Framed Tatting

 I have another smaller piece that's buried somewhere after the move, but couldn't be bothered to find it. When these pieces came to me they had glossy brown frames and 70's-tastic brown velvet backing. I fixed them up with some new fabric and a can of spray paint to make them a bit more modern and they hung on my wall through three different apartments before we came here. The move was a little overwhelming so not everything got unpacked, but I'm excited to take them out someday and give them their proper place on my wall.

For my nails I used Sinful Colors Black on Black and free handed a design similar to my tatting piece with white acrylic paint. I topped it off with a coat of Wet n Wild Matte Top Coat.

International Tatting Day Tatted Nails April 1


Monday, March 14, 2016

Seven Days of St Patrick's: Army Green and Gold Chevron Nails

Army green nails with gold stamped chevrons


Staying true to my lazy nature... I am starting the 7 Days of St. Patrick's Day Nail Art challenge three days late! It's a relaxed challenge with the freedom to come and go as you please (thank goodness) and as far as I can tell the only rule is that the polish has to be green or St. Patrick's themed. This is definitely my kind of challenge. Huge thanks to Krystal of Polish Galore for putting this whole thing together.

Army green nails with gold stamped chevrons

For day 4 I have a toned down army inspired look. This is one of my all time favorite so ugly it's pretty polish colors- Don't Get Derailed by China Glaze. It's a really dark brownish green colored cream polish. The formula is a little on the thinner side, but overall applies easily. I'm wearing two coats here. 

I stamped with Bundle Monster plate BM-604 and Maybelline Color Show polish in Bold Gold. I'm dying to get my hands on one of those clear squishy stampers to make placing images like this easier. I didn't do too bad with my regular stamper, but I could definitely see the advantage in having a clear one.

Army green nails with gold stamped chevrons

Check out all the other awesome green nails for today:


Sunday, November 8, 2015

Inspired By Rainy Weather and Misty Trees

Misty Winter Tree Nail Art


Today's nails were inspired by a picture. It's been cloudy and raining off and on all day so when I was complaining about not knowing what to paint, my husband suggested something to match the weather. Coincidentally one of my nail groups has a running inspiration challenge where everyone paints nails based on a picture. I love this picture and today was the perfect day to match it. I've been enjoying views of mist and clouds in the trees outside my window. Good thing rainy weather is my favorite because I think we're going to be having a lot of it for a while.

Misty Winter Tree Nail Art

I did a radial gradient in shades of grey for my misty background using Five Rules and Intelligence, Integrity & Courage from the China Glaze Giver collection and Your Turn from Sinful Colors. I used Bundle Monster plate BM-407 for the trees with Mundo de Unas black stamping polish and then topped it with a pale grey jelly that I frankened. I don't think it shows up too much, but it was meant to give the trees a misty look. 

The other nails are two coats of Milani, Bella Blue. This one is a shimmer polish with a black jelly base which covers quite nicely in two coats. As you can see below the micro shimmer has a slight blue to purple shift. In regular light you mostly see a teal shimmer. I added silver glitter (Atomic Splash by Orly) to look like the the wet leaves that are catching the light in the picture. Overall I think this has the look of a dark misty forest.

Milani Bella Blue

Misty Winter Tree Nail Art

This was a really fun picture to replicate and now my nails go perfectly with the weather outside. I can't wait to enjoy them with the rain coming down outside all week.

Monday, June 1, 2015

30 Days of Colour: Blogger's Choice- Vertical Neon Gradient

China Glaze Electric Nights Collection Vertical Gradient Neon

Today's post brings the 30 Days of Colour Challenge to a close. I'm a day late because my book club manicure was "due" on the same day and I didn't want to overwhelm anyone (myself) by posting twice in the same day. The last day of the challenge is blogger's choice so I'm posting this one that I painted a while back. I love this manicure and I've been waiting so long to post it since it didn't fit in with any of the prompts very well. I've done several other manicures using the Electric Nights collection from China Glaze like my other neon gradient and this water marble pedicure, the blobicure and the water marble nails to match the pedicure. I have a feeling I'm not quite done with these polishes yet either. I may or may not have another pedicure that I already did (to match the blobicure nails) and then I stamped over this one... I'm so addicted to these bright colors that I can't stop using them.


China Glaze Electric Nights Collection Vertical Gradient Neon

I'm still not really great at gradients but practice makes perfect. I think I've been improving somewhat. From purple to red here are the colors I used: Plur-ple, UV Meant To Be, Treble Maker, Daisy Know My Name?, Home Sweet House Music and Red-y To Rave.

China Glaze Electric Nights Collection Vertical Gradient Neon

Is there anything these polishes can't do? I've tried so many different manicures, but if there's anything else you'd like to see let me know!

And don't forget to check out what all the other bloggers chose for their last manicure:


Thursday, May 28, 2015

30 Days of Colour: Favorite Brand/Technique

30 Days of Colour Challenge Favorite Brand and Technique Textured Polish Finger Paints Franken Stamping Bundle Monster Iridescent Rhinestones Chevron Peach and Teal Octopus

Can you guess what my favorite technique is? Officially I'm going with skittles, but it's just because I could never decide. The best part of doing my own nails is being able to change them as often as I want and pick whatever design seems fun at the moment. I've got a little of everything here and that's the way I like it! My favorite brand is whatever is in my untried pile at the moment. There's nothing better than using a new polish for the first time. I definitely have some old favorites, but it doesn't stop the itch to collect more.

30 Days of Colour Challenge Favorite Brand and Technique Textured Polish Finger Paints Franken Stamping Bundle Monster Iridescent Rhinestones Chevron Peach and Teal Octopus

This teal color is Tails of Love from the Finger Paints Mermaid Collection. I'm starting to come around on textured polishes and I rather like this one. It's a little bumpy, but I've added top coat to even it out. The finish was shiny already so top coating it didn't take anything away from this polish. The peach is one of my franken creations. I used Bundle Monster plate BM-423 for the chevrons and BM-401 for the octopus with Mundo de Unas white stamping polish. I got the iridescent rhinestones from ebay recently for $1.40 for a pack of 300. Pretty good deal if I say so myself. It came with both white and black rhinestones and I have a ton of ideas for using them. Which is good since there are 296 more.

30 Days of Colour Challenge Favorite Brand and Technique Textured Polish Finger Paints Franken Stamping Bundle Monster Iridescent Rhinestones Chevron Peach and Teal Octopus

Let's see what everyone else has as favorites:


Monday, May 25, 2015

30 Days of Colour: Indie/Freehand

30 Days of Colour Challenge Indie Freehand Period Poops by Emerald & Ash

The 30 Days of Colour challenge is finally nearing the end. This is the 3rd to last prompt and while I've been having a ton of fun, I'm also looking forward to relaxing from what has been a somewhat hectic pace for me. I've gotten into the habit of doing my nails once per week and blogging twice and this has upped both of those considerably. I'm definitely not cut out for those challenges that require a new manicure every day if I'm having a hard time with this one. Today's challenge is indie/freehand. I've been dying to use this polish since I got it back in April. 

This beautiful polish is Period Poops from Emerald & Ash. They released on on April Fool's Day as a bit of a joke and I couldn't resist. It came with a little tampon made of felt squares (for polish removal) and bottle of chocolate scented cuticle oil that I can't show you because I've taken it to work and have been using it every day. The chocolate really cheers me up when things at work seem dire... you know.. like 5 minutes after I sit down at my desk in the morning. For the freehand portion of this challenge I painted on triangles in random patterns. I used Ulta's Set the Nude and a tiny brush to paint with.

30 Days of Colour Challenge Indie Freehand Period Poops by Emerald & Ash

30 Days of Colour Challenge Indie Freehand Period Poops by Emerald & Ash

Period poops is a rich reddish brown polish with holo sparkles and red flakies. It really pops in the sun! I can't get enough of the square bottle and the cute packaging that everything came in. I also have to say Emerald & Ash has excellent customer service. I made a typo in my address and they fixed it up for me with just one quick email. I'll definitely be placing more orders with them in the future. Their colors are pretty and fun, but it's the creative the names really make these polishes special.

30 Days of Colour Challenge Indie Freehand Period Poops by Emerald & Ash

More indie/freehand manicures here:


Friday, May 22, 2015

30 Days of Colour: Creme/Color Blocking


Ok, let me be honest with you. This manicure was a huge pain. I wasn't very excited to begin with for today's challenge. You'd think color blocking would be my thing, but no, not really. I wanted to do this one "really quickly" which quickly turned into 11:30 at night. I'm over it. But I did get a compliment at work so that was nice. Do you ever feel like the nails you feel meh about get the best response from other people? The nails I love the most get hardly any likes. I have a weird sense of style.

I had some trouble getting these to work right. I started with a base color of Intelligence, Integrity, & Courage from the Giver collection by China Glaze. It's a nice soft grey which is pretty much my favorite color besides purple. I painted rectangles of polish onto wax paper in hopes that they'd peel off so I could cut them up for my color blocking. They did not. I started over with a silicone mat and had much better luck. For each of my rectangles I used two coats of polish and then fast dry top coat to help them peel up more easily. I placed the rectangles onto bits of wax paper to give them more substance to cut through and then cut out tons of little triangles.

Colors used:
China Glaze- Queen B (dark purple)
China Glaze- Seeing Red (green.. just kidding. red)
Sinful Colors- Calypso (dark teal)
Sinful Colors- Endless Blue (royal blue)
Sinful Colors- Unicorn (pale yellow)
Milani Neon- Fresh Teal (teal)
Orly- You're Blushing (pinkish beige)

I used base coat to stick the triangles in random patterns to my nails and there ya go. Color blocking with slightly drab colors. It turned out pretty ok. 


More color blocking manicures here:


Wednesday, May 20, 2015

30 Days of Colour: Matte/Stamping

30 Days of Colour Challenge Matte with Stamping Bundle Monster Mentality Matriarch

I'm a day late on this one, but here's my matte/stamping manicure for the 30 Days of Colour challenge. I ended up being out of the house all last weekend so I didn't get a chance to paint this one until last night and I was too sleepy to post. Plus I needed to read a few more chapters of my book for this month's Polished Bookworms book club manicure. I might have taken on too much nail-wise this month, but I'm loving it.

I used one of my favorite matte polishes- Mentality's Matriarch. It's so velvety! I stamped with Mundo de Unas grey stamping polish and Bundle Monster plate BM-410. This image reminds me of fish heads/skeletons which makes me think of of this brilliant song:


Trust me.. you need to watch it (but you can, skip to 2:16 if you have a short attention span).

30 Days of Colour Challenge Matte with Stamping Bundle Monster Mentality Matriarch

I was impatient to get into bed and didn't want to wait for the matte polish to dry so I went ahead with my Sally Hansen Dries Instantly top coat. I thought y'all might want to see what it looked like shiny'd up. I think I liked it better matte which makes sense because that's how the polish was meant to be, but it does have a nice shimmer with the top coat.

30 Days of Colour Challenge Matte with Stamping Bundle Monster Mentality Matriarch

For your viewing pleasure- more matte/stamping manicures:


Sunday, May 17, 2015

30 Days of Colour: Holo Watermarble

30 Days of Colour Challenge Holo Water Marble Color Club Halo Hues

30 Days of Colour Challenge Holo Water Marble Color Club Halo Hues

It looks like such and innocent manicure until you get out into the sun and then BAM! I was having some trouble photographing this one because of the extreme level of holo-ness. 

Today's theme for the 30 Days of Colour challenge is holo/water marble. It was my first time water marbling with holo polishes. They spread really well which means the marble is sheer so you'll definitely need a good base coat if you want to try this.

30 Days of Colour Challenge Holo Water Marble Color Club Halo Hues

30 Days of Colour Challenge Holo Water Marble Color Club Halo Hues

 I used polishes from the Color Club Halo Hues collection. Technically what I did is a dry water marble or water marble decal technique where you let the marble dry on the water and then stick it to your nails. I've heard it called both things, but I haven't decided which one I like better. My next post will be a tutorial on this technique so if you're interested check back for that. 

Colors used in rainbow order: Miss Bliss, Cosmic Fate, Kismet, Over the Moon, and Eternal Beauty. I used the silver holo, Harp On It as my base color. Wow. That's pretty much all I have left to say.

30 Days of Colour Challenge Holo Water Marble Color Club Halo Hues

Let's see what everyone else did for holo/water marble day:


Thursday, May 7, 2015

30 Days of Colour: Green/Gradient

30 Days of Colour Green Gradient China Glaze Electric Nights

Arrrgh.. gradients! I still haven't mastered them. I wish I could have gotten these to blend a little better because I love the color combination. Today's theme for the 30 Days of Colour challenge is green/gradient, so I've done a gradient that has some green in it. I don't have very many green polishes and I didn't like any of them enough together to try a green only gradient, so green accents it is. What is the secret to a perfectly smooth gradient? If you know please share! I sponged over these 3-4 times on each finger and I feel like it's still patchy and blocky looking. Should I just keep sponging? How many times do you usually go over each nail? I must keep practicing!

30 Days of Colour Green Gradient China Glaze Electric Nights

I used polishes from the China Glaze Electric Nights collection for this gradient: Violet Vibes, DJ Blue My Mind, Treble Maker, and Daisy Know My Name? This collection can do no wrong. Even with my poor gradient skills I've gotten a ton of compliments on these. Probably more than any other manicure in the history of my nails. I can't stop staring at them. Soooo pretty.

30 Days of Colour Green Gradient China Glaze Electric Nights

Let's see what other delightful green/gradient creations the other ladies have for us today.