Friday, August 30, 2013

Little Leopard Nail Art

Do these look familiar? I loved my toes from my last post so much that I decided to use the same design on my nails. I knew my work week would be pretty long and rough on my hands with no time (ok, some time, but no energy) to repaint so I used my favorite Sally Hansen Complete Manicure shade, Ion. It's one of the longest lasting polishes I own and it hasn't let me down. I'm on day 5 with no chips and with any luck this one will last through the weekend. In other sad news it finally happened- I broke a nail on my blogging hand. I know all you other bloggers out there will feel my pain. I had been patching it up through the last three manicures, but it was time to make the cut. I've trimmed the rest of my nails down to match and with some creative photography in the first two pictures you can hardly tell. It should grow out fast but in the meantime please forgive my sad little crooked nail. 


There it is in the pictures above and below- the sad little broken middle finger nail. I guess I can't be perfect all the time. For technique and more info on the colors used check out this post.


Tuesday, August 27, 2013

Toesday: Teeny Tiny Leopard Print

Happy Toesday everyone! Well, it's still Tuesday here for a couple hours at least. I don't know if I mentioned before that I work on a college campus. School started back this week and it's been complete madness and lots of super fun unpaid overtime for me. On the bright side more people on campus = more compliments on my nails. I'll take any excuse to talk about polish at work. Today I have some cute leopard print toes to show you.


I had some crazy idea for a gradient which seemed like it would be great until I actually got around to the painting. It didn't happen so I have some light and dark toes by accident totally planned and on purpose. The dark is Nina Ultra Pro, Ink-ling and the lighter shade is Sally Hansen Complete Salon Manicure in Ion. I used a dotting tool to dot on LA Colors, Hottie (I can't get enough of this color lately) then painted around the dots with black polish and a tiny paint brush to create the leopard spots.


Saturday, August 24, 2013

Circle Stamping Decals

I really love all the stamping decals I've been seeing these days. It was only a matter of time before I tried it out myself so here I am. I'm not really great at stamping yet so this is an awesome way to get unlimited tries without the fear of messing up the base color. I followed this tutorial because it shows how to create multiple decals on a sheet at one time vs making the decal directly on the stamper. This appealed to me more since I only have one stamper but wanted to make decals for more than one nail. 


 It looks like the tutorial used a plastic baggie, but I used waxed paper and it turned out fine. I tried out a non fast dry top coat first but it stayed sticky forever and wouldn't peel off the sheet. I found that a fast dry top coat works much better so I ended up using Sally Hansen Insta-Dri. I painted little rectangles of top coat onto my waxed paper and waited for it to dry. Next I used Bundle Monster plate BM-206 with Wet n Wild, Black Creme for the stamp. I used a tiny paint brush and LA Colors, Hottie (neon coral), Island Girl, Aloha Paradise (teal), and Nina Ultra Pro, Ink-Ling (dark grey) to fill in the circles. For the fingers with the decals I used Sally Hansen Complete Salon Manicure in Ion as the base. Once all the circles were dry I covered it with another layer of top coat, waited for that to dry and peeled it off the sheet. I stuck the rectangles on the slightly tacky polish and trimmed around the edges with cuticle scissors. Lastly, I used a paint brush dipped in acetone to clean up the edges and help the polish melt into the base coat and adhere a bit better and finished it off with more top coat. It seems like a lot of layers, but the decal fit smoothly to the nail and didn't feel thick or bulky. It was actually a lot easier to apply than some nail decals I've tried. If I hadn't picked such a time consuming stamp to fill in I'd even say this is a pretty fast way to get a fancy looking manicure.


Wednesday, August 21, 2013

Opa! Fresno Greek Fest 2013

This weekend brings one of my favorite local events that I look forward to each year: Fresno Greek Fest. This is the 53rd year they've been holding it and it'll be my 4th year attending. The highlight is definitely the delicious Greek food. I heard on the radio today they're making 30,000 pieces of pastries. I'll be taking home at least a dozen baklava (ok maybe two dozen- they're really good). They also have Greek dancing, music and tours of their gorgeous church. I painted some festive nails to get in the spirit. 


This is: two coats of Wet n Wild, French White Creme. The lettering was done with a tiny paint brush and Sinful Colors, Endless Blue. For the yellow/gold shade I mixed together Sally Hansen Insta-Dri, Expres-so Yellow and Nina Ultra Pro, Big Spender. I topped it off with Sally Hansen Insta-Dri top coat.


Sunday, August 18, 2013

Cupcake Nails

The other day I was browsing through the archives of a new-to-me blog. If you've never seen Lab Muffin I definitely recommend checking it out. In addition to the typical nail art and makeup reviews, the author, Michelle, also gives really cool and easy to understand scientific explanations on how the products work. I came across these cupcake nails and knew instantly I had to have them for my own. The only problem- hers were super detailed water decals from an overseas company I'll likely never get my hands on. "It couldn't be too hard to hand paint, could it?" I naively asked myself. Of course it was! But I did it anyway.


The ice cream sandwich on my pinkie is practically begging me to kill him now. Whatever ice cream sandwich.. you still look delicious and I would totally eat you.


Colors used: so many!
White base- Wet n Wild, French White Creme
Blue dots- Wet n Wild, I Need a Refresh-Mint
Pink Dots- Wet n Wild, pink? no label
Purple Dots- Sinful Colors, Candy Coated
Yellow Dots- Sinful Colors, Unicorn
Cupcake bodies- Finger Paints, Don't Make A Scene
Cupcake frosting- Wet n Wild- random pink (strawberry and ice cream sandwich filling)
Spoiled- Pumping Gas (chocolate)
Spoiled- Pearly White Teeth (soft serve) 
Spoiled- Plastic Flamingo (unnaturally bright pink frosting)
Sprinkles and faces- acrylic paint


Thursday, August 15, 2013

Purple Petals

I've got another untried polish for you guys today. This is one of the new Spoiled colors I picked up at CVS. I just love how sparkly it is. It's just a bit different than the other many purples I own. 


I've got on two coats of Spoiled, Vamp 'n' Vinyl. The accent nail is two coats of Wet n Wild, 2% Milk. Next I painted a v-shaped french tip in purple and added these studs from Born Pretty. The shape of the studs reminds me of lotus petals. I guess this is my version of a floral manicure.


Close up to capture all the sparkle:


Monday, August 12, 2013

My July Haul or Why I Don't "Need" More Polish

I've never done a haul post before, but I figured this would be a good time to start. July was a record breaking month for me. I acquired a total of twenty five new polishes. That's a lot for me! I'm curious- what's the most polish you've ever bought in one month?
 

Whipped * Deluxe * Sunkissed * Dazzle * Hottie * Flurry * Hysteria
 
My local Dollar Tree had a giant end cap full of these LA Colors polishes for... a dollar. My husband actually picked up four of these for me because he's awesome and he was afraid all the good colors would be gone before I got a chance to look myself. Definitely keeping him. I've already tried Whipped (and Dazzle) in my last post and it may be my new perfect nude. I also tried Hottie here. I get the feeling the others will have to languish in my helmer for a while before I get to try them all (we still have 18 more polishes to go).


Only in Creams * Champagne Siren * Fair Metal * Vamp 'n' Vinyl
 
Spoiled is one of my favorite brands. It's inexpensive ($1.99 each) and they usually have great colors that I don't see anywhere else for that low of a price. My CVS had just put out six new colors on a random shelf since they don't fit in the normal display. I somehow managed to come home with only these four. I had high hopes for this nude, but the LA Colors shade ended up looking a bit closer to my skin tone (ghost-like pale) so I don't know when I'll get around to this one. I used the gold glitter in my last glitter gradient and was really impressed with the coverage. It's really densely packed in there. I also tried Fair Metal, but not on myself yet so sadly no pictures. It did have a great formula though. I've got Vamp 'n' Vinyl coming up in my next post so watch for that one later this week.

 
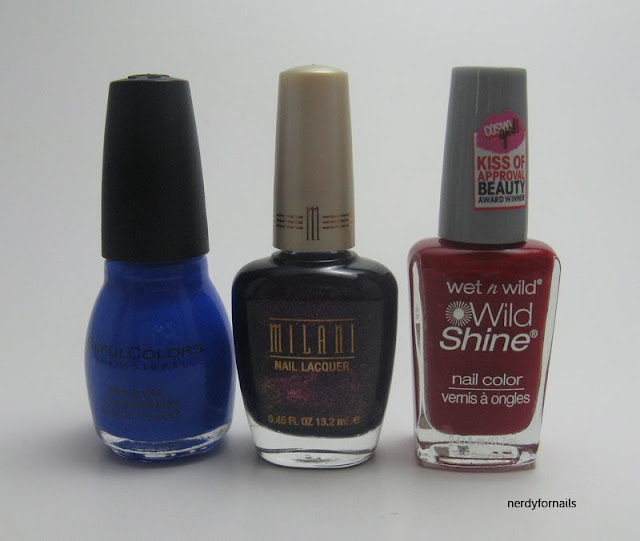
Endless Blue * Totally Cool * Red Red
 
These were purchased randomly throughout the month from various drug stores. I used Endless Blue in my failed stamping adventure. It was my fall back when the first polishes didn't work and it actually stamped really well plus it's such a vibrant bright blue. I didn't have anything quite like it in my collection so obviously I needed it. I bought the Milani because purple! And the red because I didn't have a true red cream and also the name is great.
 

Cosmic Dust * When Stars Collide
 
I was on the fence about the China Glaze holos which you may have read about here, but I'm really happy I got them. I picked them up when Sally's was doing their buy one get one free sale on China Glaze. They were on clearance for $5 so that means I got them for $2.50 each. I really can resist polish when the price is that good.


Stand the Test of Lime * Listening to Blue Reed * Who Is Ultra Violet? 
 
These were on sale at Walgreens last month for 69 cents each plus a limited edition collection. I tried all of them out in this post.

 
My unnamed Thai beauties. I tried the first three here, here and here.
 

I'd disgrace my name if I didn't give you some nerdy statistics now. I've tried 14 of the 25 polishes so that's 56%. I'd say that's a pretty good rate for trying my newbies. Of course I had to count my entire hoard of polish which is now up to 176. That means that my July haul now makes up 14% of my stash. Another fun fact- 10% of my polishes are currently on top of my desk instead of in the helmer where they belong.
Now for the real numbers- prices. One of the goals of my blog is hopefully to show that you don't have to have really expensive polish or supplies to make great nail art. I tend to favor the cheaper brands because as much as I'd like I don't have an unlimited budget for polish. I bet most of you can relate. :) I love sales and giveaways and try to keep costs down as much as possible. That being said my totally overboard month ended up costing a total of $30.84. That gives me an average of $1.23 per polish. The cheapskate in me still manages to cringe a little, but the polish addict promptly overrides it with giddy satisfaction. I can hardly wait to try out the rest of these.


Thursday, August 8, 2013

Glittery Gold

I've got a quick mani for you guys today. I think this is the simplest design I've worn in a while. I'm not sure if anyone else would call a three glitter gradient simple, but with the nude background it's definitely more toned down than my usual looks. I love how the pictures of this came out way more than I enjoyed actually wearing it. What can I say? I like my obnoxiously bright/bold colors. It seems like this would be really festive for the holidays though. I think I'll try it out again around Christmas time.


I started out with two coats of LA Colors, Whipped. This one is a really great nude for my pale skin and only a dollar. Can't go wrong there. For the glitter gradient I started with Spoiled, Champagne Siren, a gold micro glitter that has great coverage. I tried to get most of the glitter off the brush so I could get a less concentrated amount up toward the the base of the nail. I went back and added extra to the tips next. My second glitter is Sally Hansen Complete Salon Manicure, Golden Rule applied from the middle down to the tips. This one is a slightly chunkier gold glitter. My last one is Sation, Band Beauty which has mainly large and small gold glitters with some large turquoise and small pink, green and red glitters mixed in. I really love how the colors popped against the rest of the gold. And then because I couldn't stop with such a plain mani I went back and painted the under side of my nails with LA Colors, Dazzle.


Monday, August 5, 2013

Toesday- Silver and Studs

I love painting my toe nails and I really want to share, but feet, right? I went through high school under the delusion that I had "cute" feet, but as an adult I've come to my senses and realized that cute feet are like unicorns.. not real. Growing up really sucks! Despite my better judgement I'm attempting to start a new segment here on my blog. Toesday (on Tuesdays.. get it?) where I share all my crazy pedicures. So cheesy/lame. Perfect. 


I just picked up a couple of the China Glaze holos on sale at Sallys last weekend. I almost didn't buy them because they look so lackluster in the bottle, but after seeing some swatches I was surprised and willing to give them a try. They really do pop once they're painted on. This is two coats of Cosmic Dust. I added two rows of medium sized studs from Born Pretty. I love how the holo looks like liquid metal in the sun and the studs really pick up the light. It feels very futuristic.


Ok, be brutally honest. Should I stop this madness now? Do you kinda like it? Let me know.

Saturday, August 3, 2013

Neon, Neon

The weather says that summer is in full force right now even though my schedule and the calendar insist that it's soon to be over. How did the whole summer slip by already? I work at a school so August means the return of students, crazy long days and certain doom. What better way to celebrate my last days of freedom than with some bright neon skittles.


As promised in my last post I tried out another of my Thai polishes. I'm using one of the Kelly shades that I'll call Eye Searing Electric Yellow. Since none of them had names I'm doing my best to make up fun ones. The coral shade is LA Colors, Hottie. I also used Color Club, Harp On It. I used the three colors to create a water marble on my middle and ring fingers. I added a coat of Color Club flakies in Snow-Flakes on top of the pointer. I used a dotting tool to add dot accents to my thumb and ring finger and a striping brush for the pinkie.


Of course I couldn't leave out the sun shots for extra holotasticness.