Sunday, February 21, 2016

Neon Galaxy Squishy Marble Nails

Neon Galaxy Squishy Marble Nails- Inspired by a car

Neon Galaxy Car- credit unknown

Neon Galaxy Squishy Marble Nails- Inspired by a car

That car... no words.. so.. universe.. sparkly.. I need that car in my life. Since the blog life is not turning out to make me rich, the next best thing was to give my nails a similar paint job. I had a rough week and I think I can attribute 90% of it being ok in the end to taking a deep breath and staring at my fingertips. 

These nails are so magical that even my right hand turned out amazing. Squishy marble is a genius technique. I've read of some people putting the blobs of polish directly on their nail and squishing with a stamper, but that seems to make the whole thing pull up for me leaving sad bald spots. I prefer starting with a white base coat, dotting the blobs on a piece of plastic and then squishing onto the nail. That way you can get an idea of where the colors are and line them up where you want them on your nail. I squished on a couple overlapping layers of color to create this dimensional neon galaxy look.

I used: China Glaze- Too Yacht To Handle, CG- UV Meat To Be, Sinful Colors- Endless Blue, Orly- Saturated, CG- Violet Vibes and CG- Plur-ple. I used a dotter to add some stars in white and topped it off with Fairy Dust. 

Neon Galaxy Squishy Marble Nails- Inspired by a car

Tuesday, February 16, 2016

Lovatics by Demi- NYC Collection

Lovatics Collection by Demi- NYC, New York Color- Eye Shadow Palette- Natural

I've got something a little different to show you today. This is the Lovatics by Demi collection from NYC. It doesn't have anything to do with nails, but I've found that nail world starts to give way into makeup/beauty products world after a while and I couldn't resist trying this collection. Demi is just the cutest and I thought it was really cool that NYC got her to be their ambassador as well as design a custom collection together. I'm starting to try more eye shadow and lip colors over the last year and it's been really fun. I hope you'll enjoy seeing some different things on the blog as I branch out. Don't worry though, my main focus will always be nail products and art.

NYC makes some great and affordable nail products (Grand Central Station is my favorite fast-dry top coat) so when I got the chance to try out this collection I was really excited. I was hoping these products would maintain the same great quality and price I've come to expect from NYC in their nail line. These are press samples, but you can count on me for an honest opinion despite my slightly inept application. I'm still way better at nails than I am at eyes, but I'm getting better with practice.

Lovatics Collection by Demi- NYC, New York Color

The collection consists of the following products:
Eye shadow palette- 12 nude shades for around $4.99
Eyebrow pencil- comes in medium brown and dark brown for $1.99 (I tried medium brown)
Lip/Cheek tints- comes in 4 colors for $3.99 (I tried Cheeky Strawberry)
Volume and Length Mascara- in black for $4.99

Lovatics Collection by Demi- NYC, New York Color- Mascara

The mascara wand is tapered to help get the small lashes in the corners. It worked well for me and didn't leave behind clumps.

My bangs cover up my eyebrows, but I can report that the pencil worked well to fill in my brows and looked natural. I'll definitely be putting this to better use after my next bang trim. My eyelashes are kind of short and most days I get lazy and don't even bother with mascara. I need to curl them to see a real difference. I could tell that the mascara added volume, but because they stick out straight it was hard to see any extra length. I do like the color though. It helps my eyes feel a little more done.

As for the lip/cheek tint, I'm still on the fence. I feel like it worked better on my cheeks, which are naturally too rosy, so I tend to stay away from blushes in general. I was more excited to use it as a lip product, but I felt like it was really sheer and hard to build up on the lips. It also had a slight tingle. I'm not sure if that's good or bad. I need to give it another try before I make up my mind. On the plus side, it doesn't have a strong smell. I tend to like more neutral/natural smelling products, so it passes that test.


I tried out two different eye looks. The first one is a smoky eye look using a copper shade and the darkest grey of the palette. I really like how this turned out, but I swear it took me half an hour to blend it out. I need more practice so I can do it quickly. I'm addicted to winged eye liner, so the look I did on the second day was more my usual style. I blended some of the lighter shades all over my lid, then used the darkest grey with an angled brush to create my beloved winged look.

Lovatics Collection by Demi- NYC, New York Color- Eye Shadow Palette- Natural

I really like the variety of shades and finishes. Some shades are matte and others are quite shimmery. These are fairly powdery compared to some other shadows I've used, but it's easy to brush away the excess and I think it's a fair trade-off for how pigmented the colors are. My favorite shades are the shimmery pink second from the left, and the dark grey second from the right. I used these both in my winged look and I love the contrast between bright and dark. Someday soon I want to try out Demi's signature dark smoky eye look, but it's a bit outside my comfort zone (and maybe a little too fancy for work).

Lovatics Collection by Demi- NYC, New York Color- Eye Shadow Palette- Natural


Lovatics Collection by Demi- NYC, New York Color- Eye Shadow Palette- Natural SwatchesLovatics Collection by Demi- NYC, New York Color- Eye Shadow Palette- Natural

My overall impression of this collection is that it's excellent for the price. The eye shadow palette has a ton of versatility and everything is a good quality. It's hard to shake me out of my makeup rut, but I like these products so much that I hope they stick around. I've worked them into my daily routine and will need to replace them sooner or later as I use them up.

If you have a go-to eye make up tutorial please share!

Sunday, February 14, 2016

Valentine's Day Retro Cartoon Heart Shaped Nails

Valentine's Day Nails- Heart Shaped, Cartoon Style

Happy Valentine's Day! I'm not really big into this holiday, but still wanted to do something cute on my nails. The husband and I exchanged chocolate and I'm more than happy. Can't ask for much more than an excuse to stuff my face. Some people go all out though. Check out this article that says women spend an average of $100 and men $200 for V-day. Crazy!

Valentine's Day Nails- Heart Shaped

I actually wore these nails plain all week, but I kept thinking they needed something more. Finally after 5 days of wear I added the dots and outline and I love it. They look like retro cartoon hearts. I wish I had done it sooner since now it's time to take them off after only a day and a half. 

I started by filing my nails into points to create the bottom half of the heart shape. The base is two coats of Zoya, Godiva (Pixie Dust). I used a detail brush to draw the upper shape of the heart and then filled it in with the brush from the bottle of NYC, Carnival Red.

I used a dotting tool to add pink dots, and a nail art brush for the black outline and white "shine" marks. This NYC red was the perfect shade for some bright V-day art.

Valentine's Day Nails- Heart Shaped, Cartoon Style

Valentine's Day Nails- Heart Shaped, Cartoon Style, NYC Carnival Red

Here's my Valentine's gift to myself:

Side Shave Hair & Heart Nails

I've been dying to change up my hair, but can't have it too crazy for work. This hidden side shave is perfect since you can't see it at all when my hair is down. Check out CosmeticsByAnna on Instagram to see more pics of my new style and her amazing work with color. Someday I want to go for full on rainbow ombre hair if I can get the OK from the boss. A girl can dream.

Sunday, February 7, 2016

Birthday Skittlette with Swarovski Crystals

Birthday Nails with Swarovski Crystals, Zoya Cosmo and Stamping

Happy birthday to me... a couple months ago. I painted these back in December and never got around to posting them. I try to do something that feels like "me" every year. This year (and by that I mean 2015) seems to be a hybrid of the nails I did in 2013 and 2014. It's funny that two years ago I was clearly wishing for pointy nails, but still too scared to try it. I'm glad I've branched out since then. I love trying new things, but it's interesting to see that I still gravitate back to the styles and colors I like the most.

Birthday Nails with Swarovski Crystals, Zoya Cosmo and Stamping

Birthday Nails with Swarovski Crystals, Zoya Cosmo and Stamping

I think skittle or skittlette nails will always be one of my favorite things. It's hard to pick just one color, so I'll take any excuse to combine multiple things. 

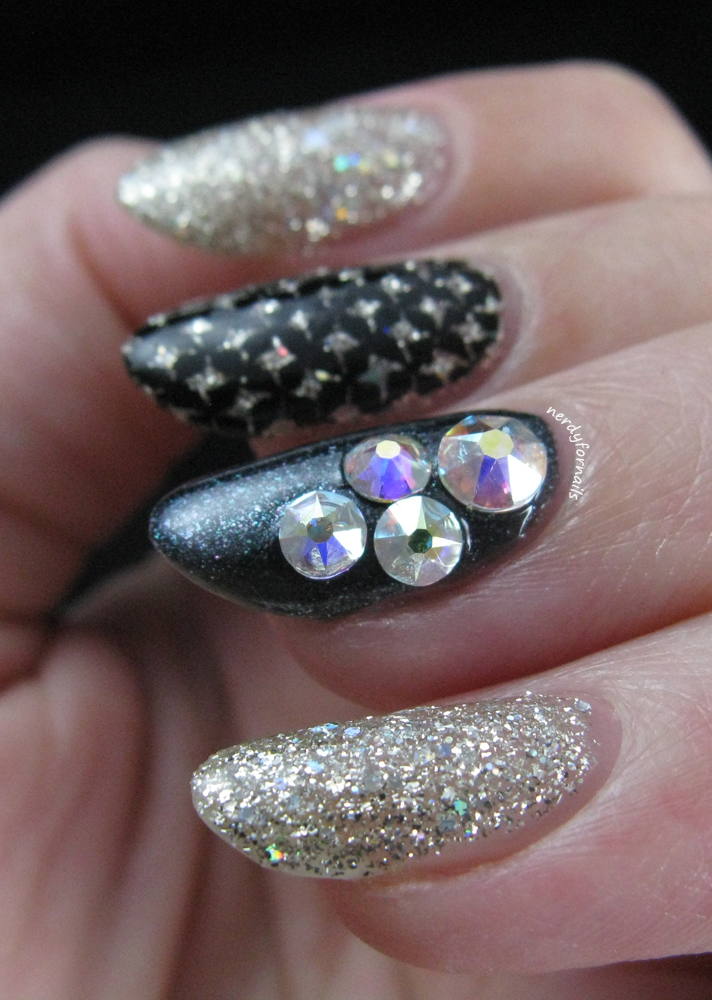
For this manicure I've used Zoya, Cosmo, a glittery silver/white holo Pixie Dust. I stamped over the middle finger with Mundo de Unas black polish and Bundle Monster plate BM-417. The ring finger is Sally Hansen Triple Shine in Slick Black. I used super glue to stick on Swarovski crystals that I got at Michael's. I love the color of these crystals and the quality is so much nicer than the plastic/acrylic gems I'm used to. They stayed bright and shiny the entire time unlike the fake gems that dull when covered with topcoat or get the finish rubbed off after a few days of wear.

Birthday Nails with Swarovski Crystals, Zoya Cosmo and Stamping

Do you do special nails for your birthday?

Sunday, January 31, 2016

The Polished Bookworms: Outlander

The Polished Bookworms January: Outlander by Diana Gabaldon

The Polished Bookworms (a book club on Facebook for ladies who enjoy combining the hobbies of reading and nail art) is starting out the new year with Outlander by Diana Gabaldon. There are several books in the series, but I've only read the first one and these nails might be a clue as to why I can't see myself going any farther.

The story and characters really can be charming at times. The main character, Claire, travels back in time to the Scottish Highlands and meets Jaime Fraser, a true red headed Scott. I thoroughly enjoyed the accents and immersion into that time period. It would have been great except apparently half of everyone from that time was a psychotic, violent sadist. I'd be reading along, really getting into the story when, boom, suddenly Jaime has half the skin ripped off his back by Captain Rapey.. I mean Randal.

I'll admit, I have no ability to stomach that kind of violence. I know those kinds of things and worse happened back then, and it's all part of painting the picture, but I just couldn't get past the torture scenes enough to make the rest worth it.

The Polished Bookworms January: Outlander by Diana Gabaldon

Because the violent parts are what stuck in my head the most, I chose to paint the results of Jaime's multiple lashings on my nails. Quite brutal, no?

The Polished Bookworms January: Outlander by Diana Gabaldon

I painted a base of Sally Hansen Xtreme Wear in Brick Wall and Spoiled, Hit the Brakes, then covered that up with OPI, My Vampire Is Buff. While everything was still semi-wet, I used a needle to drag through the top layer of polish exposing the "blood" underneath. I went back into the "cuts" with OPI, I Sing In Color which is an almost black red to make it look like the cuts had clotted a bit. The end result is fairly gruesome.. just like the book in some places.

The Polished Bookworms January: Outlander by Diana Gabaldon

I hope my nail art hasn't scarred you too much (pun intended). If violence doesn't bother you much and you like hot Scottish guys in kilts I'd recommend the series. If you're overly sensitive like me you may want to stick with something safer. Maybe someday I'll grow a thicker skin and be able to read the rest because it really was an interesting start.

Sunday, January 24, 2016

Quilted Glitter Chevron Nails

Quilted Nails with Chevrons and Glitter + Nina Ultra Pro Polish & Nail Vinyls

I'm enjoying another beautiful rainy day inside, about ready to get started on some new nails for the week. I'm kind of wishing I could be snowed in like the East Coast, but I'll take what I can get. I've been feeling indecisive about what to paint on my nails the last few weeks. Is there anything you've been wanting to see. Let me know!

Quilted Nails with Chevrons and Glitter + Nina Ultra Pro Polish & Nail Vinyls

I've combined a few things for these skittle nails. I started with two coats of Nina Ultra Pro, French Pink (my absolute favorite nude for my skin tone) as the base for the rest of the art.

 I've been wanting to try out a quilted nail for such a long time. It was a little tricky getting the lines straight! I used my old library card because it was flexible and I thought it would be easier to bend it around my nail, but I think the flex of the card made some of my lines a little wiggly. I waited a few minutes till the polish was almost dry, but still dentable and then pressed the card along the nail in a criss-cross pattern. I placed a piece of glitter at each intersection to tie it in with the other glitter nails. 

I used my chevron Nail Vinyls to block off different parts of my nails and painted either a coat of Sinful Colors, Black on Black or sponged on several coats of Nina Ultra Pro, Gilded, which is a really pretty pink-toned holo glitter.

I couldn't decide which color of background I liked best with these nails. What do you think?

Quilted Nails with Chevrons and Glitter + Nina Ultra Pro Polish & Nail Vinyls

Wednesday, January 13, 2016

Pantone Color of the Year 2016: Rose Quartz & Serenity Nail Art

Pantone Color of the Year 2016 Rose Quartz & Serenity Beachy Nail Art Gradient with Pearls and Gold Glitter


This definitely falls in the "sorry, not sorry" category. I've been taking an unintentional, but apparently much needed break from my blogging. I just hadn't been feeling it and keeping busy with so many other things. This week I've been feeling the urge to blog again, so I'm happily back at it. I hope the motivation keeps up because I've been painting a ton of great stuff and the internet needs more nails.

I was fully expecting to hate this manicure. For the last couple years I've done nails inspired by the Pantone Color of the Year (check out 2014 and 2015) and I didn't want to stop the tradition now, but barf... Pantone chose not one, but two of my least favorite colors. I tend to like dark or bold shades the most so I wasn't thrilled for these pastel baby colors. The explanation for why Pantone chose these is mildly interesting. Apparently they think we're all a bunch of stressed out crazy people in search of some relaxation (seriously paraphrasing here), so they chose these soothing colors to reflect increased mindfulness in 2016.

To my great surprise I love how this turned out. The colors make me think of a beach sunrise with the gold sand and pearls. The softness of the colors really works with the overall look and feel of the manicure.

Pantone Color of the Year 2016 Rose Quartz & Serenity Beachy Nail Art Gradient with Pearls and Gold Glitter

I love having a different color on the bottom side for an added twist. I did lavender underneath with a hidden pearl.

Pantone Color of the Year 2016 Rose Quartz & Serenity Beachy Nail Art Gradient with Pearls and Gold Glitter

I started with two coats of Love & Beauty in Light Blue, then sponged several layers of Sinful Colors, Easy Going onto the tips. I did a layer of top coat and sprinkled loose gold craft glitter from Michael's along the sides of each nail. I also placed larger glitters and pearls from Born Pretty in random places to complete the look. 

On the bottom side I used two coats of Sinful Colors, Candy Coated.

Pantone Color of the Year 2016 Rose Quartz & Serenity Beachy Nail Art Gradient with Pearls and Gold Glitter

What do you think about Pantone's choices this year? This manicure may have grown on me, but I don't think I'll be running out to buy pants in these colors anytime soon.