Monday, March 14, 2016

Seven Days of St Patrick's: Army Green and Gold Chevron Nails

Army green nails with gold stamped chevrons


Staying true to my lazy nature... I am starting the 7 Days of St. Patrick's Day Nail Art challenge three days late! It's a relaxed challenge with the freedom to come and go as you please (thank goodness) and as far as I can tell the only rule is that the polish has to be green or St. Patrick's themed. This is definitely my kind of challenge. Huge thanks to Krystal of Polish Galore for putting this whole thing together.

Army green nails with gold stamped chevrons

For day 4 I have a toned down army inspired look. This is one of my all time favorite so ugly it's pretty polish colors- Don't Get Derailed by China Glaze. It's a really dark brownish green colored cream polish. The formula is a little on the thinner side, but overall applies easily. I'm wearing two coats here. 

I stamped with Bundle Monster plate BM-604 and Maybelline Color Show polish in Bold Gold. I'm dying to get my hands on one of those clear squishy stampers to make placing images like this easier. I didn't do too bad with my regular stamper, but I could definitely see the advantage in having a clear one.

Army green nails with gold stamped chevrons

Check out all the other awesome green nails for today:


Sunday, March 6, 2016

Loreal Revitalift Volume Filler Review


Usually it's months and months in between VoxBoxes so I was happily surprised to be chosen for the L'Oreal Revitalift VoxBox at the same time as the Dry Spray box. This box came with four different Revitalift products to be used at different times of the day. The secret ingredient is hyaluronic acid which is supposed to help give skin that youthful looking fullness. Of course skin produces less of this ingredient on its own as we age, so this line of skin care products has been developed to help add some of it back.

I've always been told I look young so it's hard to face the truth that my skin is starting to betray my age. I miss the days when people said I could pass for 20 and now I'm not even getting carded half the time. My main problem is the little horizontal lines that run under my eyes. Where do these things even come from? Do I go around squinting all day without realizing it?

For someone with a 30 second beauty routine that consisted of washing my face and using one moisturizer, it was a bit overwhelming to open up all these products. Why the heck do I need four products that all do the same thing?? I wanted to give it a fair shot and I've learned a lot in the process. I've tried to be a lot more conscious about treating my skin better. I'm trying to be diligent about actually removing leftover eye makeup instead of lazily ignoring it, and patting on products gently instead of rubbing and stretching the skin.


Step 1: Each morning I wash my face. L'Oreal makes a Revitalift Cream Cleanser, but that didn't come with my sample box so I stuck with my normal gentle cleanser. 

Step 2 is the Revitalift Day Cream pictured above. Pro: it absorbs quickly. It seems to leave my skin with an almost powdery feeling finish. I'm not sure what that means or if it matters, but my skin does feel sufficiently hydrated and not at all oily after using it. Con: It's hard for us long nailed girls to get the cream out of the pot. I usually try to scoop it out on the top side of my nail rather than the under side so I don't waste product stuck under my nails. It's not really a big deal now while the pot is full, but I'm a little worried that it will become more of a hassle the farther down I get.

Step 3 is the day-time volume filler eye treatment which is the smallest tube in the top picture. A tiny amount is all you need to dab around the eye area. It absorbs super quickly so I can move right on to applying the rest of my eye makeup


Step 4 is the night cream. It comes in a tube (hooray). When I get home from work I wash my face again and then apply the night cream. I use just a bit more than what I've shown above to cover my whole face. My favorite part: it's tinted slightly lavender. Purple and grey are my two favorite colors so L'Oreal is spot on with the packaging.


Step 5: The volumizing concentrated serum. It comes in this fun syringe-like tube that you dispense by pushing the button at the bottom. Like the other eye treatment, a little bit goes a long way. I dab some around my eyes each night and that finishes up the routine. None of this takes much longer than what I was doing before. After I figured out what each of the products was for, it's actually relaxing to spend a few extra seconds each day pampering myself.

All of the products feel good on my skin and are a good quality. I'm one of those lucky adults who still gets breakouts like a teenager. I can't say that the creams have magically cleared it all up, but they definitely haven't irritated my skin or made it worse.

The most important question is whether or not the Revitalift products really work to volumize skin and fill in stubborn lines. I've taken0 before and after pictures with no makeup and no touch-ups to show my results. It's hard to get exactly the same lighting and angle, but I think these pictures come close enough to show a truthful before and after. The after picture was taken about four weeks after I started using the products and I've used them all as directed each day.


Fun fact: I have a scar in the inner corner of my left eye that I got as a baby when a drunk guy decided to punch through a window. My mom happened to be standing nearby holding me and I was cut by a shard of glass. I never try to cover it up because it isn't very noticeable and even if it was, it's kind of an awesome story.
The lines are still visible to me in the after picture, but I do think the skin around them looks a bit plumper and the lines a bit less deep and creased. Do you think the difference is noticeable enough to justify a purchase?

I always tend look at products through a budget-minded filter. The pricing on Amazon is $15-$25 each depending on which of the four products you're looking at. I know anti-aging products can be quite pricey, so this doesn't actually seem too expensive, especially since I do feel like I've seen some measurable results. I'm going to continue my experiment over the next few months to see if my results become even more pronounced and I'll let you ladies know.

If you want to learn more about these products check out L'Oreal's Website and if you want to join Influenster and test out products for yourself let me know and I'll send an invite your way.

The legal stuff: I received these products complimentary from Influenster for testing purposes.


Wednesday, February 24, 2016

Dove Dry Spray Review- Influenster TryDry Spray VoxBox

Dove Dry Spray Review- Influenster TryDry Spray VoxBox

I've got another beauty related review for you today. These Dove dry sprays are courtesy of the Influenster TryDry VoxBox. You may remember, we've already been down this road with Influenster once before. Given how I absolutely hated the dry spray the first time around I'm surprised they wanted to do this again with me. My main complaint with the first spray I tried, Degree Dry Spray, was the overwhelming smell. It was a "sport" formula with "fresh energy" scent. 

I was willing to try again because Dove is generally supposed to be a bit more natural and gentle on the skin and I had higher hopes for the cucumber "cool essentials" scent. This VoxBox also came with a men's version. Given that I'm in possession of a husband who could be convinced to undergo this experiment with me, Influenster sent the box on its way and here we are.

Guy with a siamese
Here are both of my boys trying out the dry spray (no kitties were sprayed during the production of this review).
One Saturday morning before our usual grocery shopping trip we both sprayed up and were on our way. First of all we were more than happy to be leaving the apartment because the spray fumigated the entire place better than a bug bomb. So sorry we had to leave the kitty behind to marinate. Though the scent was definitely more pleasant than the previous variety, it was still terribly overwhelming. You can't really control the extra spray and fumes that spread around as you're spraying your under arms. 

We could smell each other's sprays the entire car trip to the store and back through several layers of winter clothes. By the time we got home we were both overly grumpy and on edge from the constant barrage of scent. It should be noted that we're both extremely sensitive and picky about scented products and generally try to avoid them.

Lasting power: this stuff has it. They advertise 48 hours of antiperspirant and I believe it! I was able to wash most of mine away in the shower. The husband wasn't so lucky. He used 4 different kinds of soap and even borrowed my shower poof to scrub, but the scent clung to his under arm hair and wouldn't let go. He smelled of the stuff for hours afterward.

Maybe we overdid it the first day. I had a hard time knowing how much was enough or too much to use. When it sprays on it's pretty much instantly dry, so it was hard for me to decide if I'd done a thorough job with the application. I also felt that it was a bit gummy under my arms, so maybe that indicates I did use too much. Husband has a job where he works in close contact with people and wants to make sure he's not the smelly guy at work, so he's been using his spray in small quantities. He's still not crazy about the scent, but appreciates the heavy duty antiperspirant and not sweating when the temperature fluctuates in the office.

My overall feelings: this product isn't for me. I don't like spraying something into the air that I'm potentially inhaling. I don't like the imprecise application. I really don't like the scent. If they made a truly unscented version I still don't think I'd love it. I just don't feel like this is the best value for my money and y'all know how cheap I am. At $5.49, each can claims to last up to 8 weeks. My usual brand costs less, works well and lasts probably over a year since I usually go really light on the application. The dry sprays just couldn't win me over.

Dove Dry Spray Review- Influenster TryDry Spray VoxBox

The cans have a cool design that I think would make for some interesting nails. I didn't have time to actually paint the nails, but I threw together the polishes and supplies I'd use if I were going to do it. For my manly can I have: Spoiled- Permission To Proceed, Revlon- Magnetize, Sinful Colors- Your Turn, and Revlon- Iconic. I like the bottom image on Bundle Monster plate BM-412 to match the dots on the can.

For my girly can I put together Sinful Colors- Snow Me White, Zoya- Sailor, LA Colors- Current and Maybelline Color Show- Bold Gold, along with a nail art brush to paint some designs like a cute cucumber print or navy and gold stripes.

Dove Dry Spray Review- Influenster TryDry Spray VoxBox

Have you tried the dry sprays before? Let me know what you think! I'm curious to see how other people feel about it.

Disclaimer: I received these products complimentary from Influenster for testing purposes.

Sunday, February 21, 2016

Neon Galaxy Squishy Marble Nails

Neon Galaxy Squishy Marble Nails- Inspired by a car

Neon Galaxy Car- credit unknown

Neon Galaxy Squishy Marble Nails- Inspired by a car

That car... no words.. so.. universe.. sparkly.. I need that car in my life. Since the blog life is not turning out to make me rich, the next best thing was to give my nails a similar paint job. I had a rough week and I think I can attribute 90% of it being ok in the end to taking a deep breath and staring at my fingertips. 

These nails are so magical that even my right hand turned out amazing. Squishy marble is a genius technique. I've read of some people putting the blobs of polish directly on their nail and squishing with a stamper, but that seems to make the whole thing pull up for me leaving sad bald spots. I prefer starting with a white base coat, dotting the blobs on a piece of plastic and then squishing onto the nail. That way you can get an idea of where the colors are and line them up where you want them on your nail. I squished on a couple overlapping layers of color to create this dimensional neon galaxy look.

I used: China Glaze- Too Yacht To Handle, CG- UV Meat To Be, Sinful Colors- Endless Blue, Orly- Saturated, CG- Violet Vibes and CG- Plur-ple. I used a dotter to add some stars in white and topped it off with Fairy Dust. 

Neon Galaxy Squishy Marble Nails- Inspired by a car

Tuesday, February 16, 2016

Lovatics by Demi- NYC Collection

Lovatics Collection by Demi- NYC, New York Color- Eye Shadow Palette- Natural

I've got something a little different to show you today. This is the Lovatics by Demi collection from NYC. It doesn't have anything to do with nails, but I've found that nail world starts to give way into makeup/beauty products world after a while and I couldn't resist trying this collection. Demi is just the cutest and I thought it was really cool that NYC got her to be their ambassador as well as design a custom collection together. I'm starting to try more eye shadow and lip colors over the last year and it's been really fun. I hope you'll enjoy seeing some different things on the blog as I branch out. Don't worry though, my main focus will always be nail products and art.

NYC makes some great and affordable nail products (Grand Central Station is my favorite fast-dry top coat) so when I got the chance to try out this collection I was really excited. I was hoping these products would maintain the same great quality and price I've come to expect from NYC in their nail line. These are press samples, but you can count on me for an honest opinion despite my slightly inept application. I'm still way better at nails than I am at eyes, but I'm getting better with practice.

Lovatics Collection by Demi- NYC, New York Color

The collection consists of the following products:
Eye shadow palette- 12 nude shades for around $4.99
Eyebrow pencil- comes in medium brown and dark brown for $1.99 (I tried medium brown)
Lip/Cheek tints- comes in 4 colors for $3.99 (I tried Cheeky Strawberry)
Volume and Length Mascara- in black for $4.99

Lovatics Collection by Demi- NYC, New York Color- Mascara

The mascara wand is tapered to help get the small lashes in the corners. It worked well for me and didn't leave behind clumps.

My bangs cover up my eyebrows, but I can report that the pencil worked well to fill in my brows and looked natural. I'll definitely be putting this to better use after my next bang trim. My eyelashes are kind of short and most days I get lazy and don't even bother with mascara. I need to curl them to see a real difference. I could tell that the mascara added volume, but because they stick out straight it was hard to see any extra length. I do like the color though. It helps my eyes feel a little more done.

As for the lip/cheek tint, I'm still on the fence. I feel like it worked better on my cheeks, which are naturally too rosy, so I tend to stay away from blushes in general. I was more excited to use it as a lip product, but I felt like it was really sheer and hard to build up on the lips. It also had a slight tingle. I'm not sure if that's good or bad. I need to give it another try before I make up my mind. On the plus side, it doesn't have a strong smell. I tend to like more neutral/natural smelling products, so it passes that test.


I tried out two different eye looks. The first one is a smoky eye look using a copper shade and the darkest grey of the palette. I really like how this turned out, but I swear it took me half an hour to blend it out. I need more practice so I can do it quickly. I'm addicted to winged eye liner, so the look I did on the second day was more my usual style. I blended some of the lighter shades all over my lid, then used the darkest grey with an angled brush to create my beloved winged look.

Lovatics Collection by Demi- NYC, New York Color- Eye Shadow Palette- Natural

I really like the variety of shades and finishes. Some shades are matte and others are quite shimmery. These are fairly powdery compared to some other shadows I've used, but it's easy to brush away the excess and I think it's a fair trade-off for how pigmented the colors are. My favorite shades are the shimmery pink second from the left, and the dark grey second from the right. I used these both in my winged look and I love the contrast between bright and dark. Someday soon I want to try out Demi's signature dark smoky eye look, but it's a bit outside my comfort zone (and maybe a little too fancy for work).

Lovatics Collection by Demi- NYC, New York Color- Eye Shadow Palette- Natural


Lovatics Collection by Demi- NYC, New York Color- Eye Shadow Palette- Natural SwatchesLovatics Collection by Demi- NYC, New York Color- Eye Shadow Palette- Natural

My overall impression of this collection is that it's excellent for the price. The eye shadow palette has a ton of versatility and everything is a good quality. It's hard to shake me out of my makeup rut, but I like these products so much that I hope they stick around. I've worked them into my daily routine and will need to replace them sooner or later as I use them up.

If you have a go-to eye make up tutorial please share!

Sunday, February 14, 2016

Valentine's Day Retro Cartoon Heart Shaped Nails

Valentine's Day Nails- Heart Shaped, Cartoon Style

Happy Valentine's Day! I'm not really big into this holiday, but still wanted to do something cute on my nails. The husband and I exchanged chocolate and I'm more than happy. Can't ask for much more than an excuse to stuff my face. Some people go all out though. Check out this article that says women spend an average of $100 and men $200 for V-day. Crazy!

Valentine's Day Nails- Heart Shaped

I actually wore these nails plain all week, but I kept thinking they needed something more. Finally after 5 days of wear I added the dots and outline and I love it. They look like retro cartoon hearts. I wish I had done it sooner since now it's time to take them off after only a day and a half. 

I started by filing my nails into points to create the bottom half of the heart shape. The base is two coats of Zoya, Godiva (Pixie Dust). I used a detail brush to draw the upper shape of the heart and then filled it in with the brush from the bottle of NYC, Carnival Red.

I used a dotting tool to add pink dots, and a nail art brush for the black outline and white "shine" marks. This NYC red was the perfect shade for some bright V-day art.

Valentine's Day Nails- Heart Shaped, Cartoon Style

Valentine's Day Nails- Heart Shaped, Cartoon Style, NYC Carnival Red

Here's my Valentine's gift to myself:

Side Shave Hair & Heart Nails

I've been dying to change up my hair, but can't have it too crazy for work. This hidden side shave is perfect since you can't see it at all when my hair is down. Check out CosmeticsByAnna on Instagram to see more pics of my new style and her amazing work with color. Someday I want to go for full on rainbow ombre hair if I can get the OK from the boss. A girl can dream.

Sunday, February 7, 2016

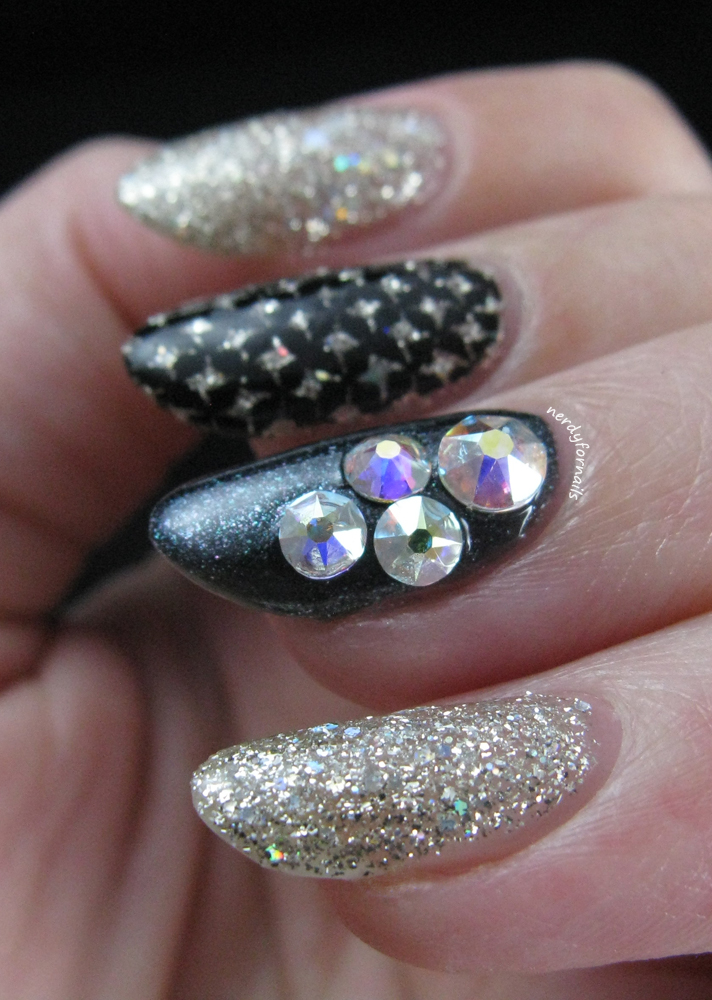
Birthday Skittlette with Swarovski Crystals

Birthday Nails with Swarovski Crystals, Zoya Cosmo and Stamping

Happy birthday to me... a couple months ago. I painted these back in December and never got around to posting them. I try to do something that feels like "me" every year. This year (and by that I mean 2015) seems to be a hybrid of the nails I did in 2013 and 2014. It's funny that two years ago I was clearly wishing for pointy nails, but still too scared to try it. I'm glad I've branched out since then. I love trying new things, but it's interesting to see that I still gravitate back to the styles and colors I like the most.

Birthday Nails with Swarovski Crystals, Zoya Cosmo and Stamping

Birthday Nails with Swarovski Crystals, Zoya Cosmo and Stamping

I think skittle or skittlette nails will always be one of my favorite things. It's hard to pick just one color, so I'll take any excuse to combine multiple things. 

For this manicure I've used Zoya, Cosmo, a glittery silver/white holo Pixie Dust. I stamped over the middle finger with Mundo de Unas black polish and Bundle Monster plate BM-417. The ring finger is Sally Hansen Triple Shine in Slick Black. I used super glue to stick on Swarovski crystals that I got at Michael's. I love the color of these crystals and the quality is so much nicer than the plastic/acrylic gems I'm used to. They stayed bright and shiny the entire time unlike the fake gems that dull when covered with topcoat or get the finish rubbed off after a few days of wear.

Birthday Nails with Swarovski Crystals, Zoya Cosmo and Stamping

Do you do special nails for your birthday?